By using our Paragon Open Cloud Backup Platform (OCB Platform) you gain access to the full set of tools to make up your own robust and agile backup solution of any size. In this article, we’re going to walk you through the entire process of creating your own backup application from scratch. Read this article to the end to get a full picture of the best cloud backup application development practices.
What is inside our Open Cloud Backup Platform
First thing first, you need to familiarize yourself with the general principles of how a typical default backup application works. Especially if built on our OCB Platform backend.
So, you need to back up your system as is and store the backup to the cloud. For that, you may use our out-of-box Paragon Cloud Backup solution or build your own backup using our comprehensive Open Cloud Backup Platform (OCB). Here, we’re going to look through the second case. The basis of our OCB Platform is an SDK, which consists of the following components:
- Backup model framework
- Load forecasts Reports
- Local agents bundle (installation and management package)
- Cloud Storage access (if needed)
- Documents and Instructions
The bundle of agents includes:
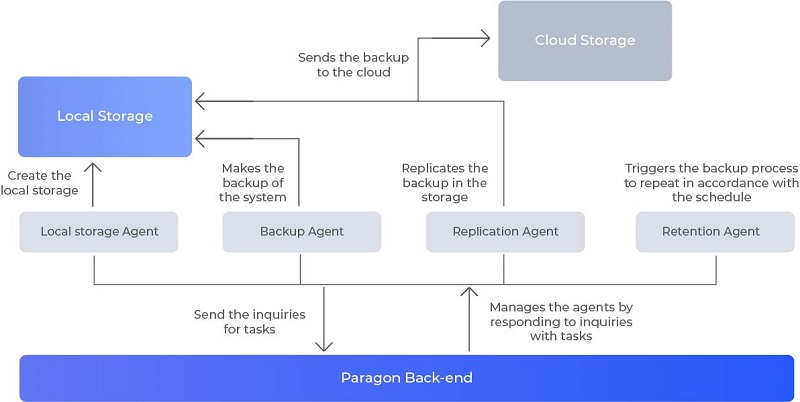
- Backup Agent – it conducts the backup, restoration and — operations
- Replication Agent uploads the backups to the cloud
- LocalWorker – it checks the statuses of local sessions and matches them to the statuses conducted in the cloud
The set of microservices:
- Inventory service for storing information about the user’s recovery points, locations, and activities.
- Registry service for user registration, authorization as well as provides API to work with users.
- Storage service for storing information about stores, catalogs and backups
- Agent Coordinator service for managing the agents, which are the components, working on a user’s machine and performing tasks like recovery or replication
- Jobs Coordinator service manages and ensures the interaction with the Job Manager.
- Notification service sends the notifications to users about the jobs done
- Authority service is responsible for authorization and provides API
All the components work together to fulfill backup tasks, just like it’s displayed in the scheme.
Basically, the option of replication to the cloud is adjustable. Users can choose a сloud to store their backups or do not store backups in the сloud at all. According to our experience and feedback from the clients, it’s much more efficient to keep the replica of the backup in the cloud. So, we’re going to drop a step of making up the local storage and set up direct replication to the cloud within the closest update release.
So, this is about how the application’s architecture built up in general. Now, let’s dive a little bit deeper into the details of how it works.
How to Build a Backup Solution
The process of the application development is based on assembling the core functionality for the components. For that, developers may use our ParagonOpen Cloud Backup Platform, which includes the Cloud Backup SDK and microservices to manage SDK components. The microservices are hosted on Paragon servers which have excellent 24/7/365 uptime.
It’s super important to understand what type of objects you are going to backup – physical (any type of data and system on the physical hardware) or virtualized environments (Hyper-V, VMware vSphere). For the first type of backup, you need a set of agents to be installed on the endpoints, while the second type implies the agentless way of backup.
Then, follow a general algorithm consisting of 3 steps:
- Set up the local agents on your working station(s). For that, use our Local Agents Installation Guide
- Define the operations you need to be performed, and their schedule – plan your workflow. Your planning should include:
- Backup objects
- Locations for backups – decide between the local and cloud and set it up
- Figure out the workflow –
- Code the front-end: user interface and core functionality
- Implement the planned workflow using our API
- Test everything – request a Paragon Cloud Sandbox
- Deploy and promote
Local Agents Installation Guide
The installation is performed with the help of the command line.
1. Install the bundle and identify the path of installation on your local end-point:
PRMInstallDir="My Install Dir"2. Identify the role of the installation. It should be an “agent”. So, perform just a simple command as follows:
Roles="Agent"3. Set up a regular upgrade function with the following command:
PreventUpgrade=0This command allows the system to check for upgrades and upgrade the agents automatically. If you don’t like it, just block the upgrades by adding “1” to the value:
PreventUpgrade=14. Set the user name and the user password for accessing the server:
User="input your user name"
Password="input your password"
5. Set up the administrative server address which an end-point will be registered on:
AdminServer="input your server address"Cloud Backup REST API
Now let’s dive a little bit deeper into the most important parts of the algorithm.
Following our experience, the best practice would be to prototype all the necessary processes and schedules in advance, by literally using a pencil with a paper. After that, when the entire range of jobs would be defined, it’s widely a common practice to use a sniffer to fulfill the jobs and identify the signals.
After that, while developing the front-end of application use our API to fulfill the necessary planned jobs. The description of the methods is available in the API documentation section on our Developers Portal.
If you have found a spelling error, please, notify us by selecting that text and pressing Ctrl+Enter.