
Having a backup of your Windows system in the event, it goes belly up on you is definitely something you need to think about before it actually happens! This article will cover everything about backups: from the different methods of backing up your data to the best open source and paid Windows 10 backup options available.
In this article, you will learn:
- What is a backup?
- Backup Methods
- Why is Backup Important
- How to backup with Windows 10 / 8 / 7
- How to backup Windows 10, 8, or 7 – the entire OS
- Backup Windows to Cloud
- Restore Windows 10
- Windows 10 Troubleshooting Guide
- Backup Windows Server 2016
- Windows 10 backup software
- Best Windows Backup Software
- Open-source Windows backup solutions and tools
What is a backup?
A backup is a copy of computer data taken and stored elsewhere that can restore the original files after a data loss event (like data deletion or corruption). Backups are a simple form of disaster recovery. Still, not all backup systems can reconstitute a complete computer system and other complex configurations like a computer cluster, active directory, or database server.
Since data storage requirements can be large, an information repository model can provide structure to this storage. Other data storage devices can also be arranged differently to provide geographic dispersion, data security, and portability.
An information repository can be as simple as a list of backup media files and the dates they were produced. More complex options include a computerized index, catalog, and/or a relational database.
The 3-2-1 rule states that there should be at least three copies of data stored on two different storage media types plus one copy kept off-site like in cloud storage.
Backup methods
There are different backup data methods: unstructured, system imaging, incremental, reverse incremental, near CDP (continuous data protection), and differential.
An unstructured repository can be a stack of DVD-Rs or external hard drives (HDDs) with minimal information about what was backed up and when. While it’s the easiest one to implement, a high level of recoverability could be easily compromised – what if one of the DVDs or drives is damaged?
A system imaging repository contains complete source data copies taken at specific points in time. By copying system images, admins record the last known good system configurations. Thus, imaging is mainly used for deploying standard configurations (aka Golden Images) rather than making ongoing backups.
Let’s also outline the major differences between image and file backups. An image backup copies everything on your drive (including partitions and the boot sector), while a file backup only copies your data files (such as documents, pictures, spreadsheets, etc.)
Incremental backup stores data that has been changed from a reference point in time — duplicate copies of the unchanged data are not copied and stored. Some backup systems can create a synthetic full backup from an incremental series that mimics the full backup.
Continuous Data Protection (CDP) refers to a backup that instantly saves a copy of every change made to data. Near CDP backup apps automatically take incremental backups by default every 15, 60 minutes, or 24 hours. This means they only allow restores to an interval boundary – any data changed after that time isn’t saved until the next save point. Near-CDPs (except for Time Machine backups from Apple) log every change on the host system by saving byte or block-level differences rather than file-level differences. True CDPs must run in conjunction with a virtual machine (hence, these are more applicable for enterprise client-server backups). This is why near-CDPs are more practical for personal backups.
A reverse incremental backup stores a recent archive file mirror of the source data and a series of differences between the mirror in its current and previous states. A reverse incremental backup starts with a non-image full backup. After the full backup is performed, the system periodically synchronizes that full backup with the live copy. It’s done either with hard links, as in the case of Apple Time Machine, or using binary differentials.
A differential backup saves only the data that has been changed since the last full backup, regardless of any other differential backups that might have been performed. Compare that to an incremental backup where backup copies are changed according to the most recent backup of any type.
There are also other types of incremental backup such as multi-level incrementals and block-level incrementals that compare parts of, rather than entire files.
Why is backup important?
Let’s outline a few reasons why backup is important.
The main reason for all data backups is to save important files in the event the system crashes, or the hard disk drive (HDD) fails. Cloud or off-site backups are necessary to protect against natural or man-made disasters such as the destruction of servers and computers due to fires and floods. Therefore the 3-2-1 rule is an important part of any backup methodology.
For enterprises, backing up is just as (if not more) important: regular backups guarantee the safety of financial and customer data, archiving of other important information, and even offer an increase in productivity due to a reduction in wasted time in dealing with accidentally erased or corrupted data, malware attack or other data loss issues, as it can simply be safely restored – at least when using quality backup software and adhering to that 3-2-1 rule.
How to backup with Windows 10 / 8 / 7
Let’s see how you can back up different versions of Windows with internal backup tools. We’ve described the Windows backup process in our article in greater detail, so please refer to that article for more information. Herein though, let’s briefly summarize the backup process for different versions of Windows.
In 2020, it’s also worth considering backing up to an SSD (solid state drive) rather than an HDD. External hard disk drives are still cheaper than SSDs, but SSD prices have fallen significantly and are much faster and more robust than HDDs.
To backup the internal HDD for Windows 10:
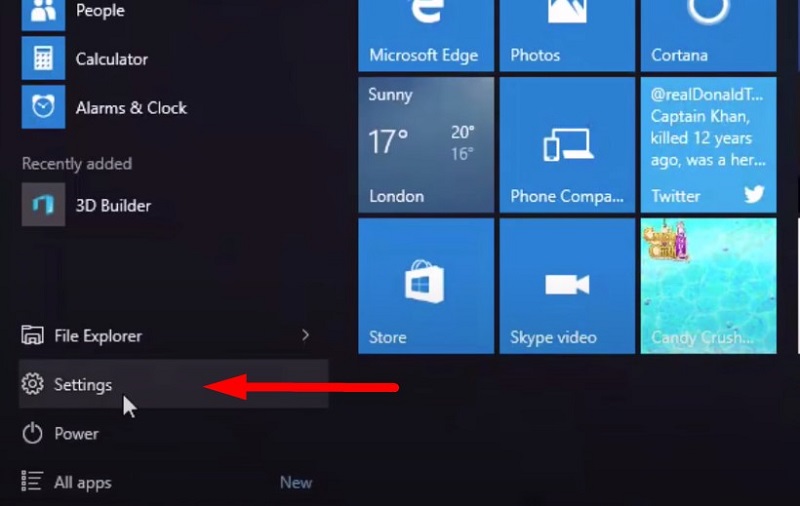
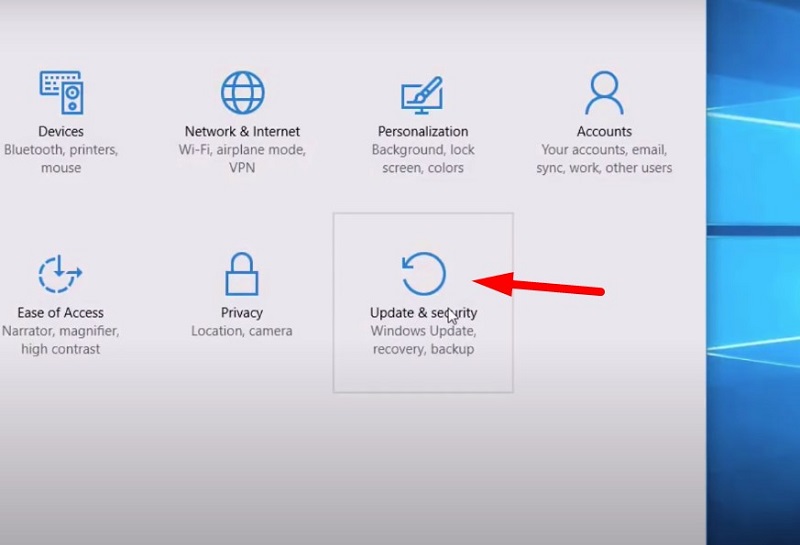
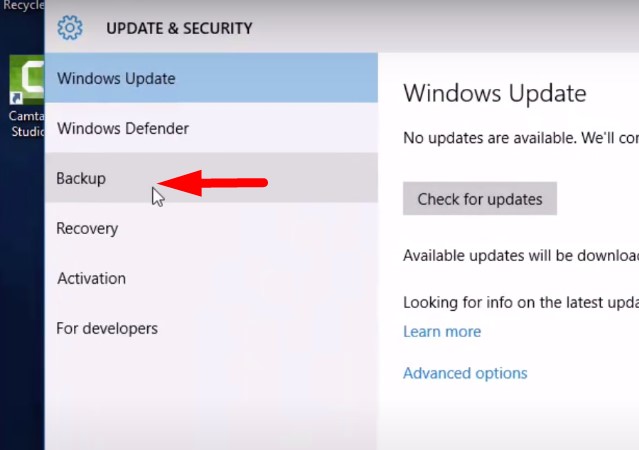
1. Click Start → Settings → Update & Security → Backup
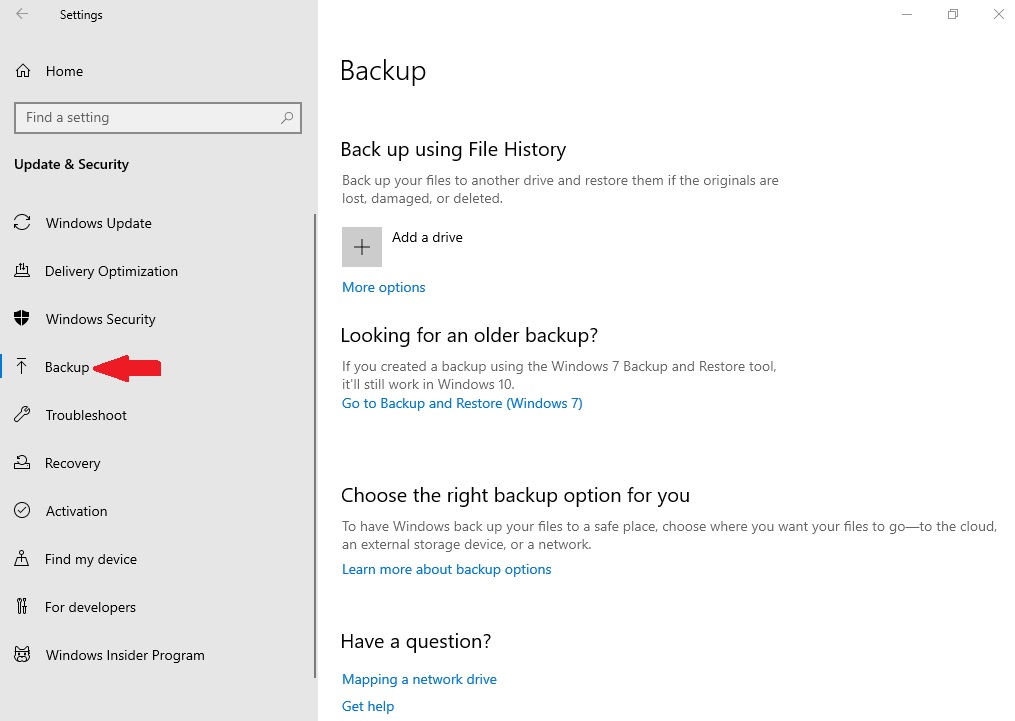
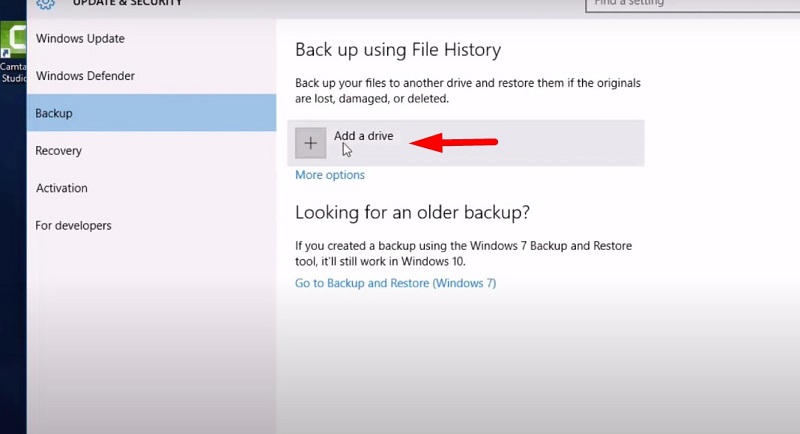
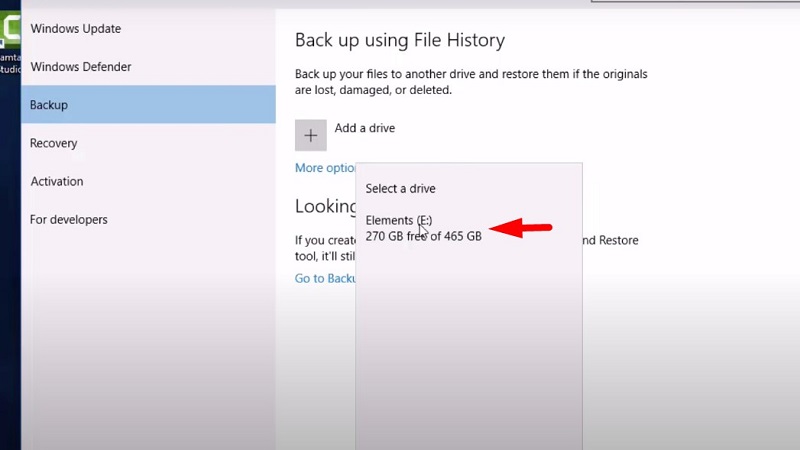
2. In the Backup section: you can add a drive, choose a network location, or pick up an external HDD or SSD you want to back up to.
For Windows 8 – the process is similar to that of Windows 10:
- Click Start → Settings → Control panel → System and Security → Save backup copies of your files with File history
- Select a destination to save your backup files to
- Click Turn on to start the backup process → Save your backup on an external drive or choose a network location.
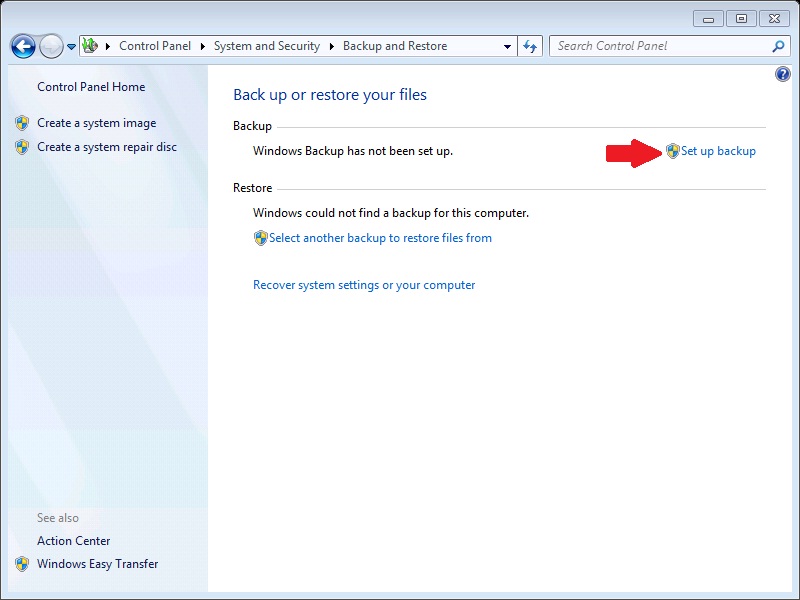
For Windows 7:
1. Click Start → Control Panel → System and Security → Backup and Restore → Set up backup
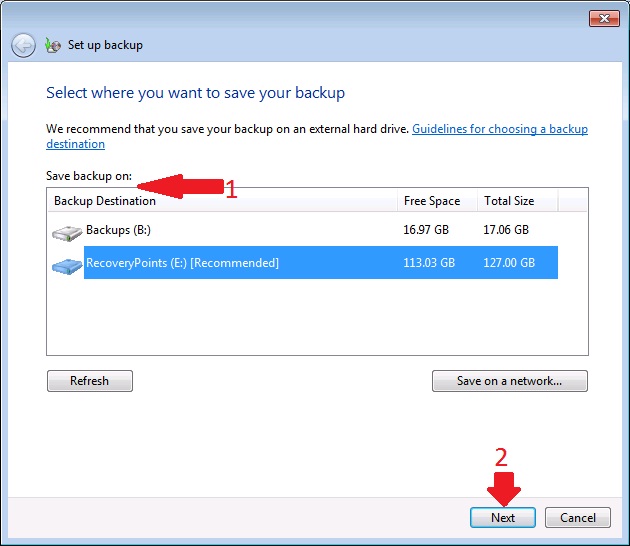
2. Select the destination for backing up your files → Click Next
3. Choose ‘Let Windows choose’ for Windows to pick up relevant files for backup automatically
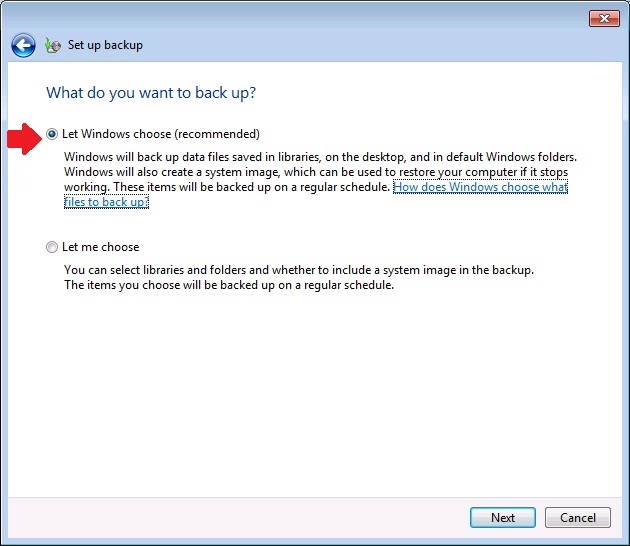
4. Click Next → Verify the backup details
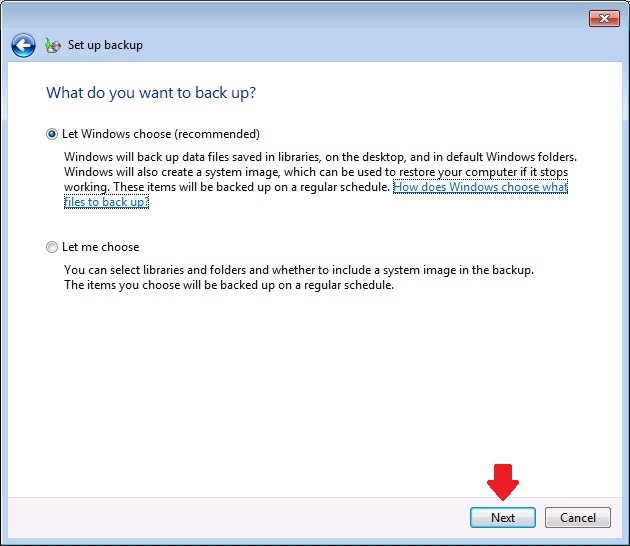
5. Click Save settings, then Run backup
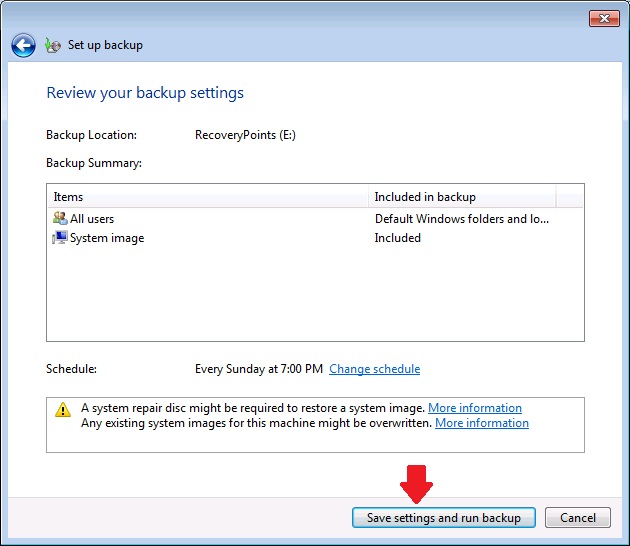
6. After the backup’s complete, the Backup and Restore utility will show your backup file’s size.

How to backup Windows 10, 8, or 7 – the entire OS
Further below, we’ll describe in more detail how to back up different versions of Windows: by creating a backup system image, backing up to an external drive, USB, or Cloud. We’ll also outline the best Windows backup software programs currently available.
Create a Windows 10, 8, or 7 backup image
As mentioned above, an image backup is very important because it saves you the major hassle of reinstalling everything in case something goes wrong – you can restore your system to exactly as it was when the last backup was made. You should perform an image backup at least 3 to 4 times per year, if not more regularly, and save it to an external HDD or SSD.
Image backup for Windows 7
To create an image backup for Windows 7, follow the steps:
1. Plug in an external drive and make sure Windows can access it
2. Type “backup” in the Start menu’s search field → Select Backup and Restore
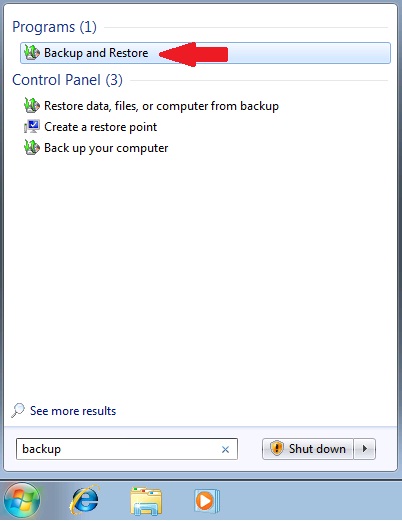
3. Click “Create a system image” in the left-hand panel
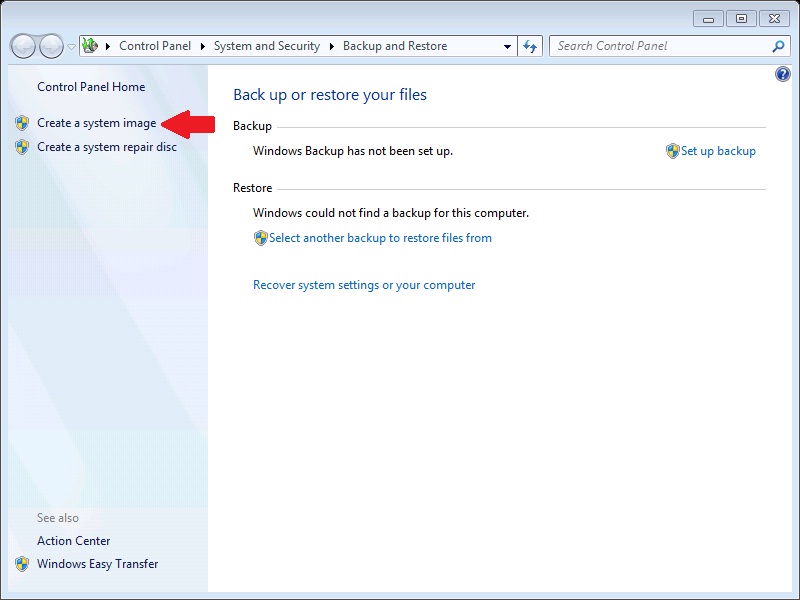
4. After the backup is complete, which may take a few hours, you’ll be prompted to create a system repair disk.
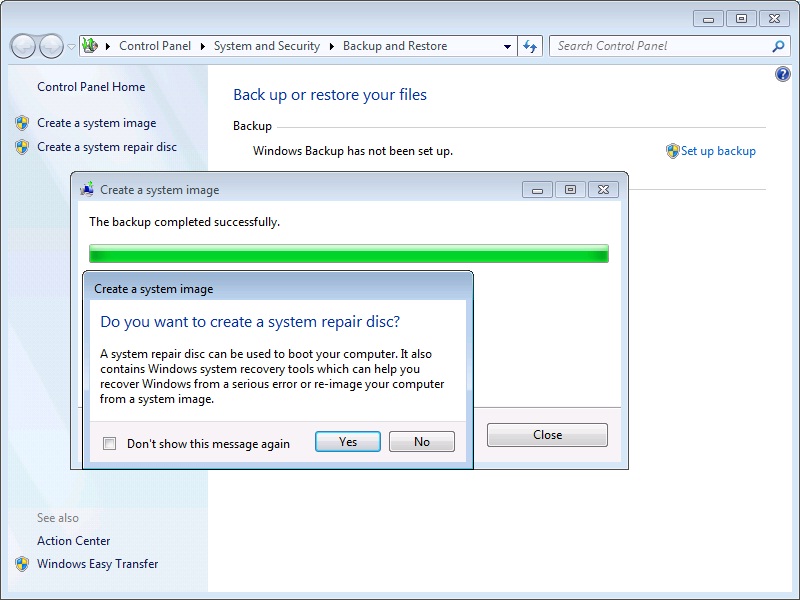
Image backup for Windows 8
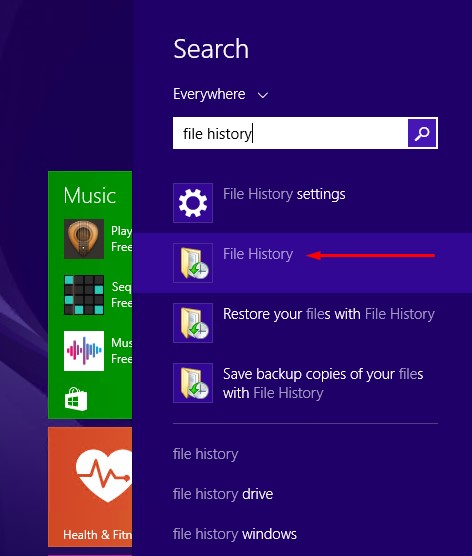
To create a Windows 8 backup image, follow the steps below:
1. Plug in an external drive and make sure Windows can access it
2. Use the Search to bring up and load the File history program

3. When the File history window comes up, click System Image Backup in the lower-left corner
4. Follow the instructions in the backup wizard. The backup may take a few hours
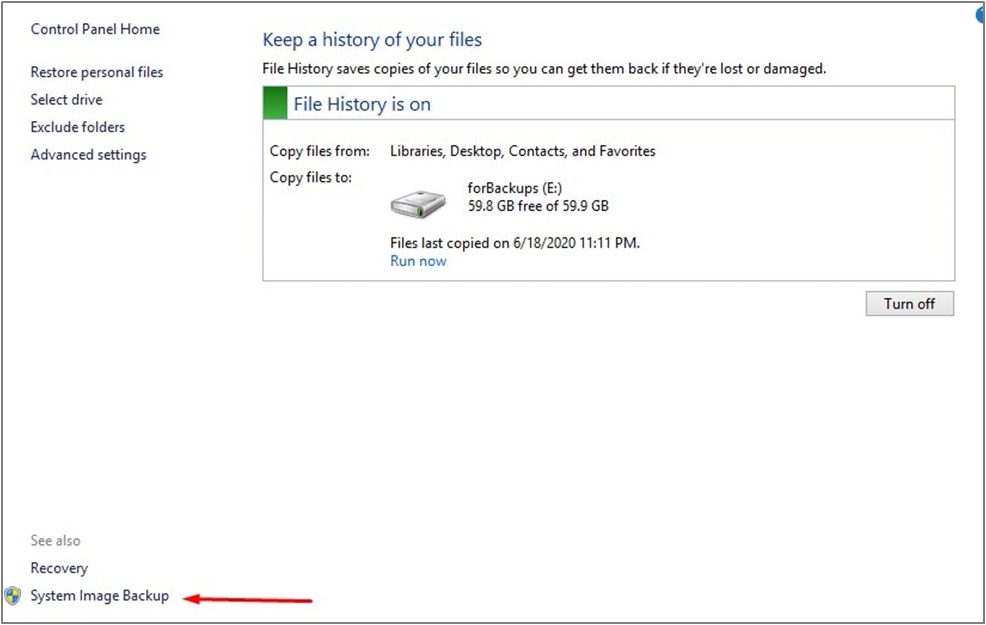
5. Go back to File History and click Recovery, which is just above the System image backup
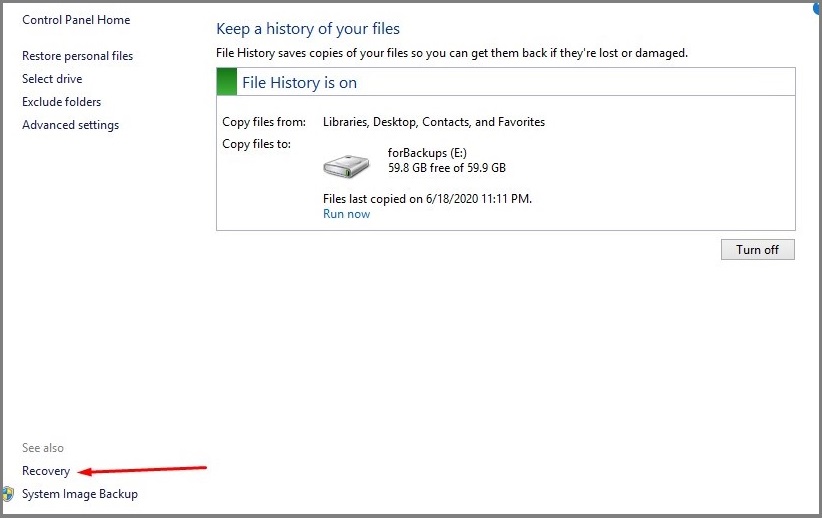
6. Select Create a recovery drive and follow the steps.
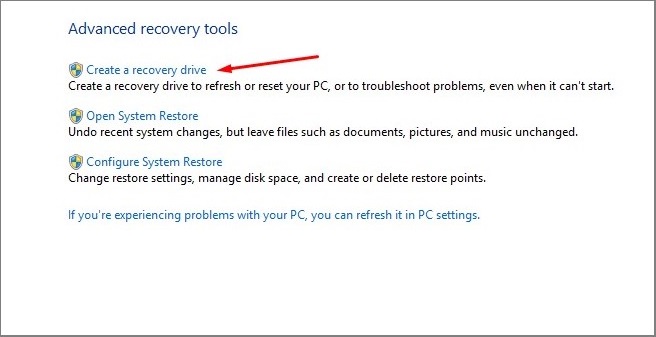
Image backup for Windows 10
For an image backup of Windows 10:
1. Plugin your external hard drive and make sure Windows can access it
2. Go to Control Panel → Backup and Restore (Windows 7) [otherwise just type Control Panel in the search field] NB: Don’t worry about the label for Windows 7. The backup procedure will take a snapshot of your current Windows 10 system
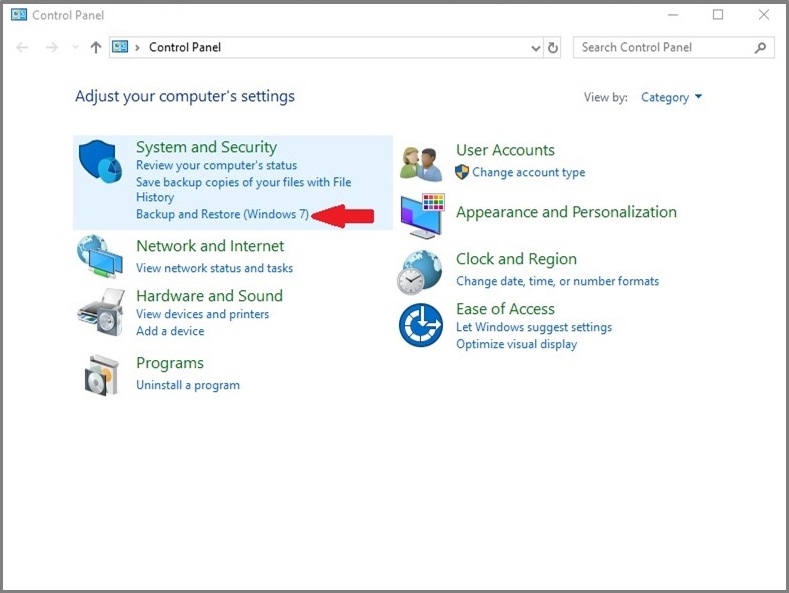
3. In the upper left corner, choose to Create a system image
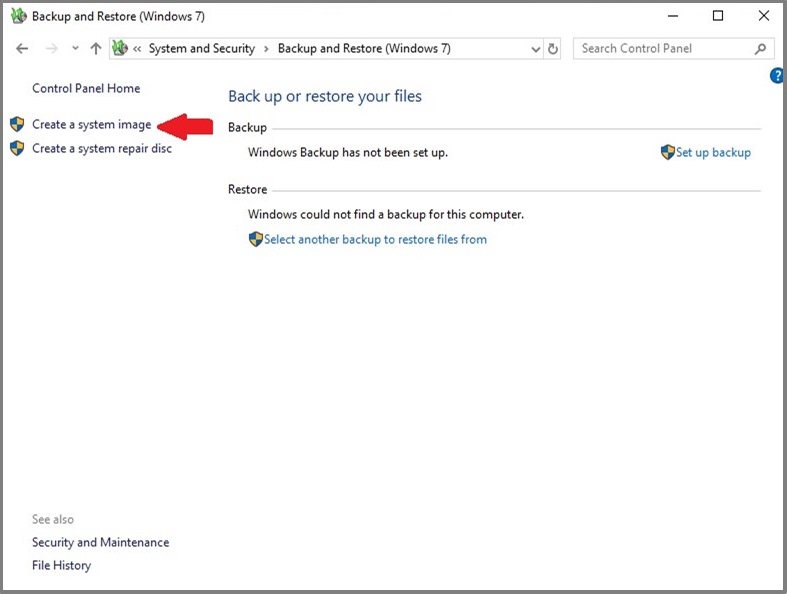
4. When prompted to choose where to save the backup, select your external drive.
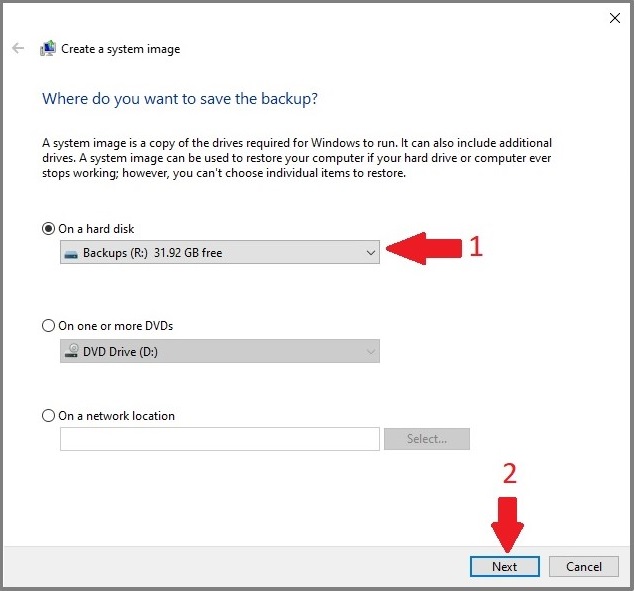
5. Click Next and make sure your C: drive is selected [plus any other drives you want to back up]
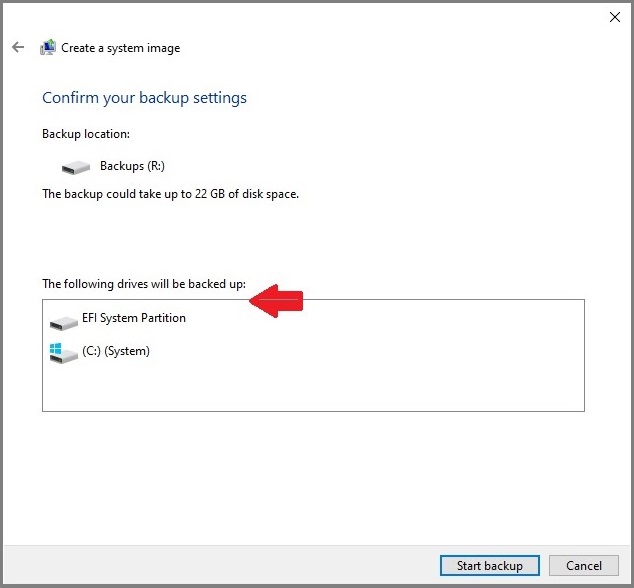
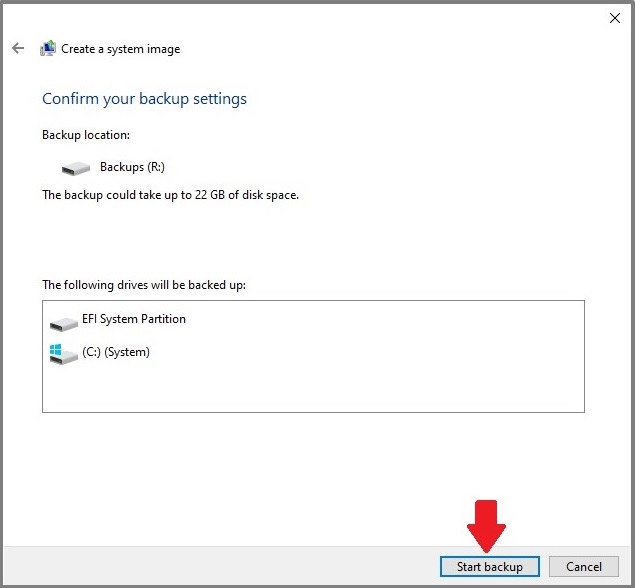
6. Click the Start backup button
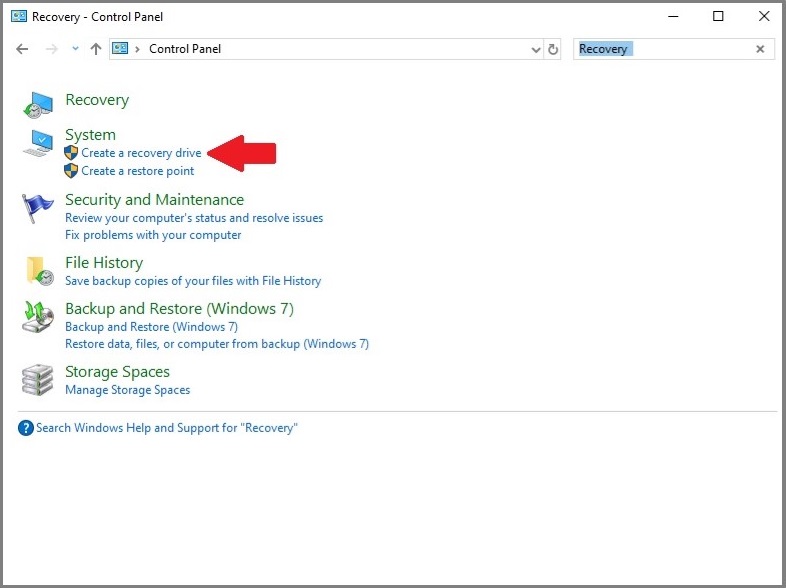
7. After the backup is completed, which may take a few hours, you’ll be asked if you want to create a system repair disc. If your PC has an optical drive, create the disc. But if not, create a Recovery Drive: plug in a flash drive, → open Control Panel’s Recovery tool → Click Create a recovery drive → follow the prompts.
Backup Windows 10 to an external HDD or SSD
We’ve already described how you should create a system backup image to an external drive. Let’s see how you can create other types of backup.
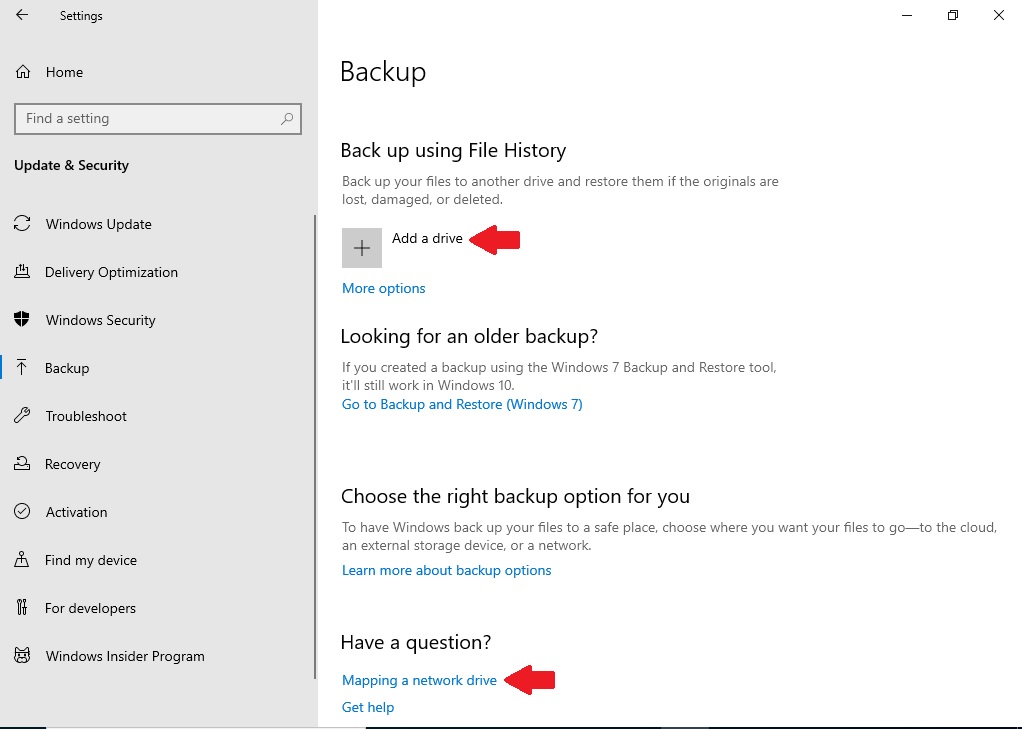
For backing up files to an external drive, follow the path:
Start → Settings →
Update & Security →
Backup →
Hit Add a drive →
Then choose an external drive or network location for your backups
Go to More options →
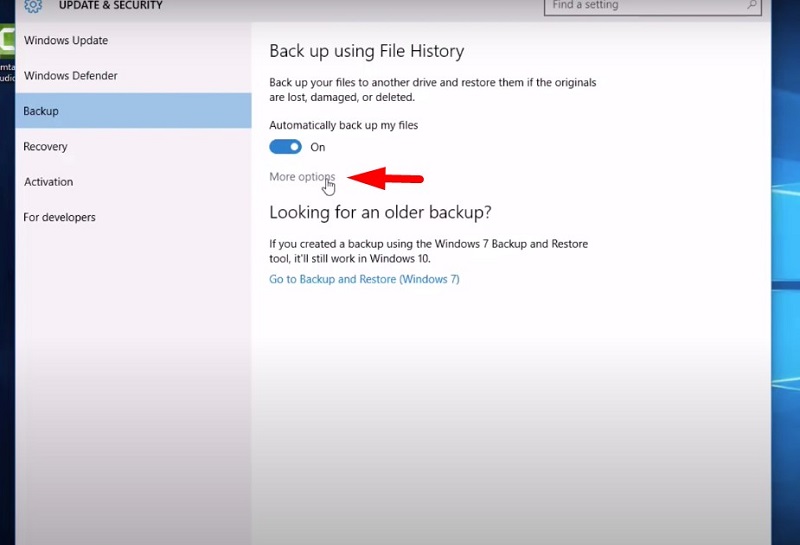
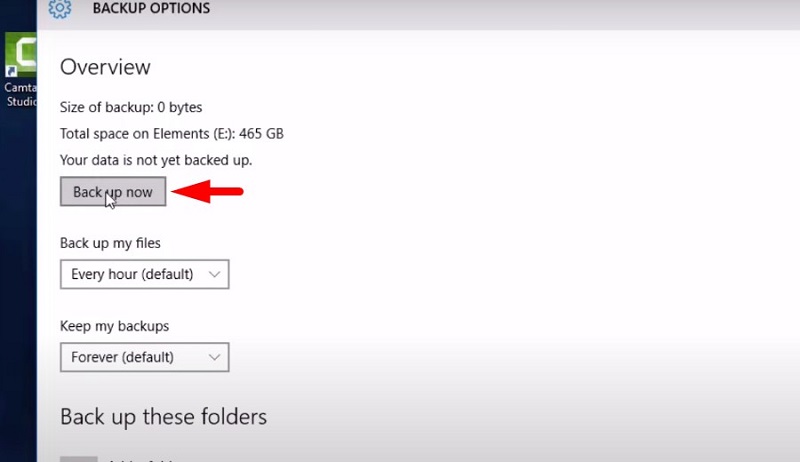
Start the backup by pushing “Back up now” button
Backup Windows 10 to USB
To backup Windows 10 to USB, make sure your flash drive fits the following criteria: make sure it’s empty. Otherwise, all data previously stored on the drive will be erased, and make sure that it is at least 16GB. However, it is best if your USB drive is the same size or larger than your internal drive. 128GB and 256GB USB flash drives are readily available in stores, with 256GB drives less than $50.(US)
For backup, follow these steps:
1. In the search field, type “Create a recovery drive.” While at it, you might be asked for an admin password or to confirm your choice
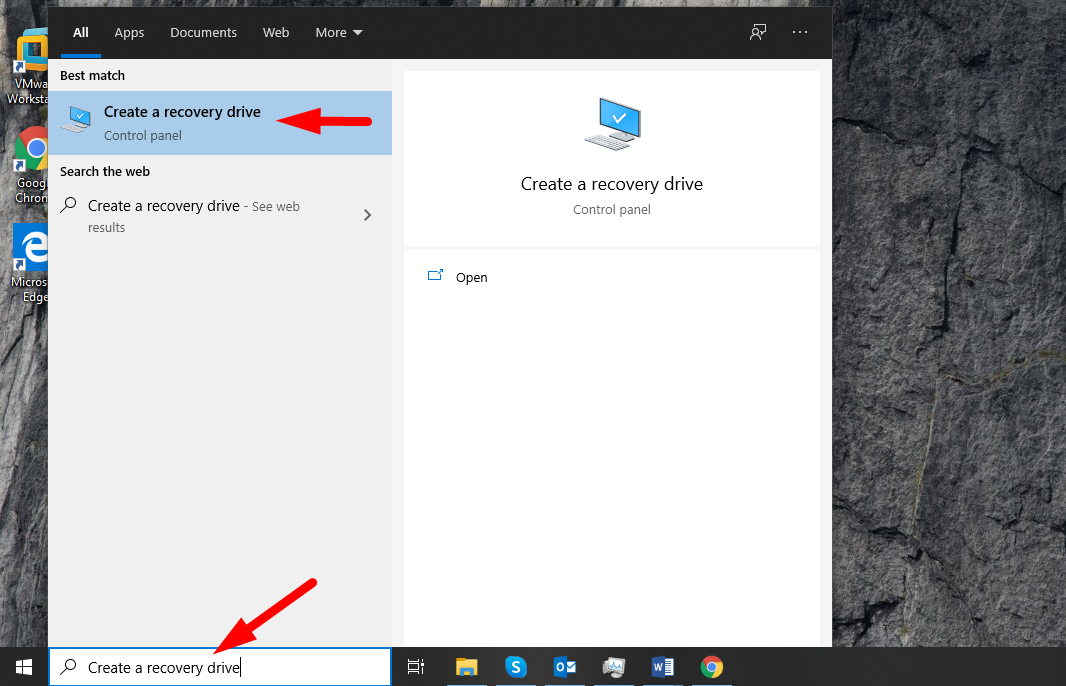
2. As soon as the tool opens, ensure Back up system files to the recovery drive is selected, and then click Next
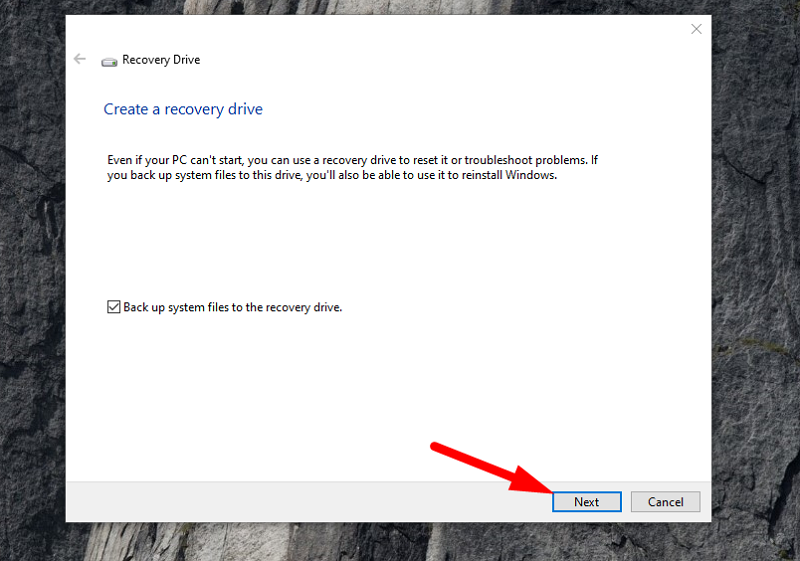
3. Connect a flash drive to your computer, select it, and then click Next

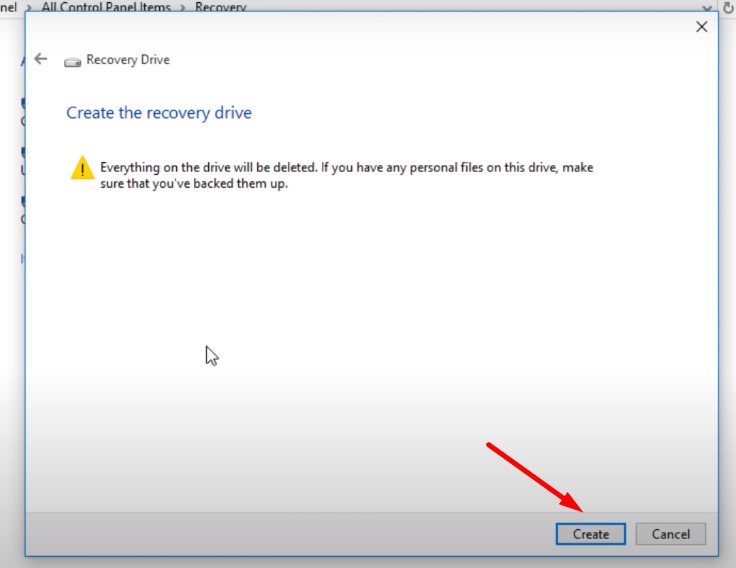
4. Choose to Create. The backup process might take a while.
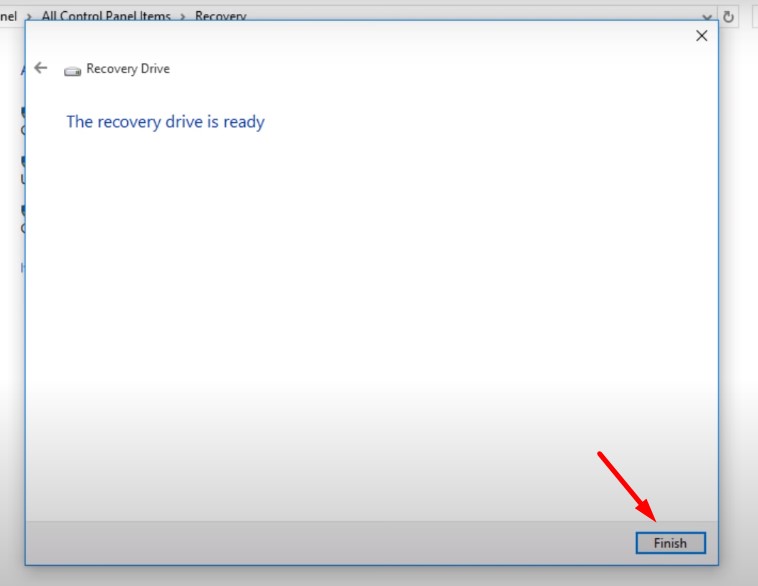
5. As soon as the backup is done, click “Finish”
Backup Windows to Cloud
A cloud-based backup is one of the safest and easiest ways to access your files wherever you happen to be and on whatever device. There’s no need to purchase hardware; however, you may need to pay for extra storage. Free options often do not offer enough gigabytes of storage for the data you wish to backup.
To backup Windows to a cloud service, you need to have a cloud-based location that you choose and Internet access.
There are several cloud backup solutions that you can choose from. We’ve described them earlier in the Ultimate Backup article. For the purposes of this article, let’s concentrate on the Microsoft solution, called OneDrive.
Backup Windows 10 to OneDrive
While installing Windows, you might have been prompted to set up automatic backups to OneDrive. However, if you have not yet done so, you still can. Microsoft offers 5GB of storage free of charge. If you need more than that, you’ll have to purchase a subscription.
If you didn’t set up automatic backups, then follow these steps:
For Windows 10, the OneDrive app comes already installed, so you’ll need to log in with your Microsoft username and password and set it up to start running. If you don’t have a Microsoft username and password, you’ll have the opportunity to create one. For other versions of Windows, you’ll need to install the new OneDrive sync app.
Set up your OneDrive:
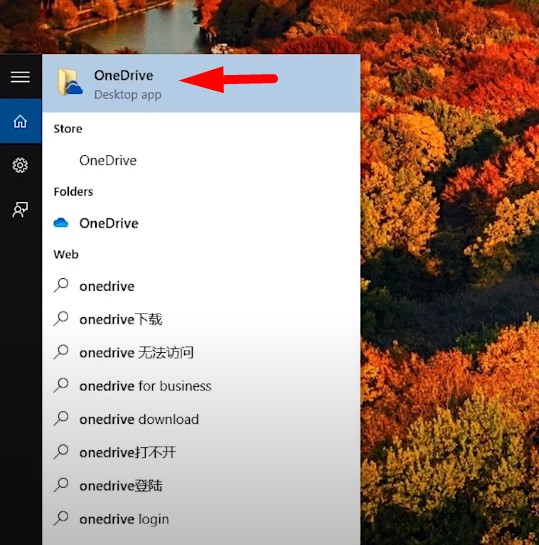
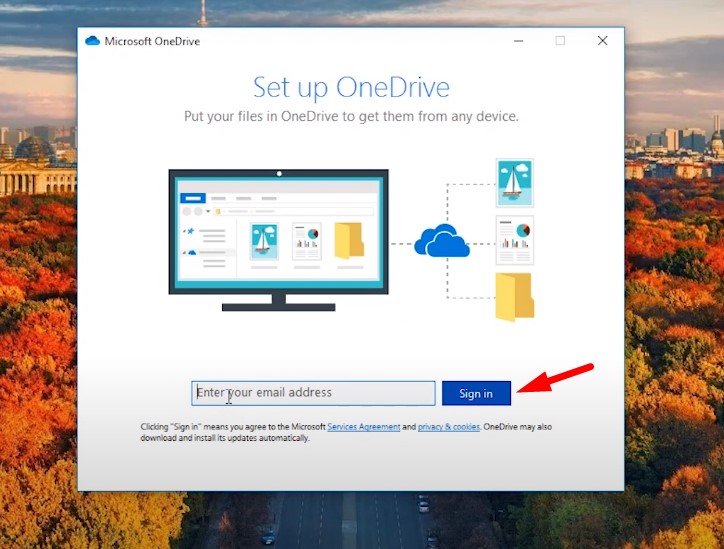
1. If you have an account signed in to OneDrive: Search for “OneDrive” in the search field and open it.
1.1 Enter your username and password, and select Sign in.
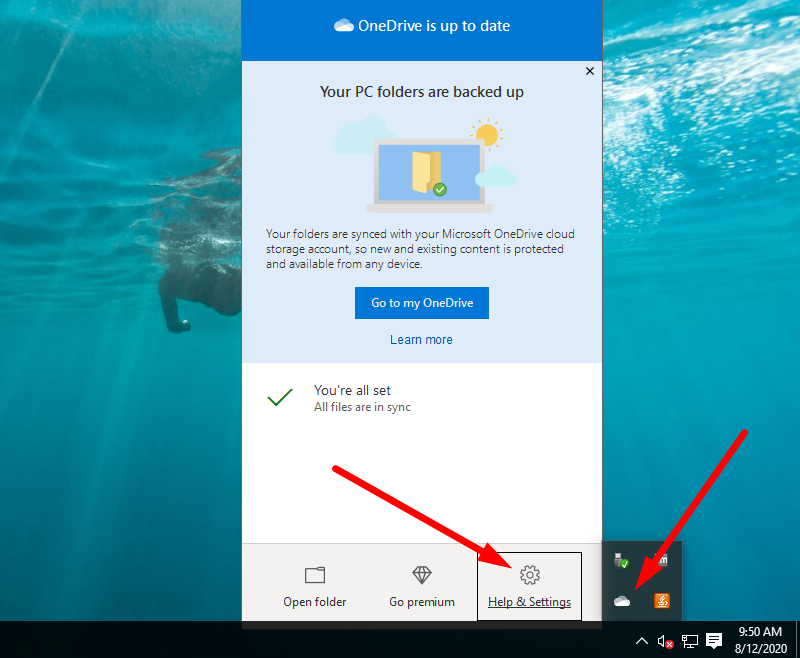
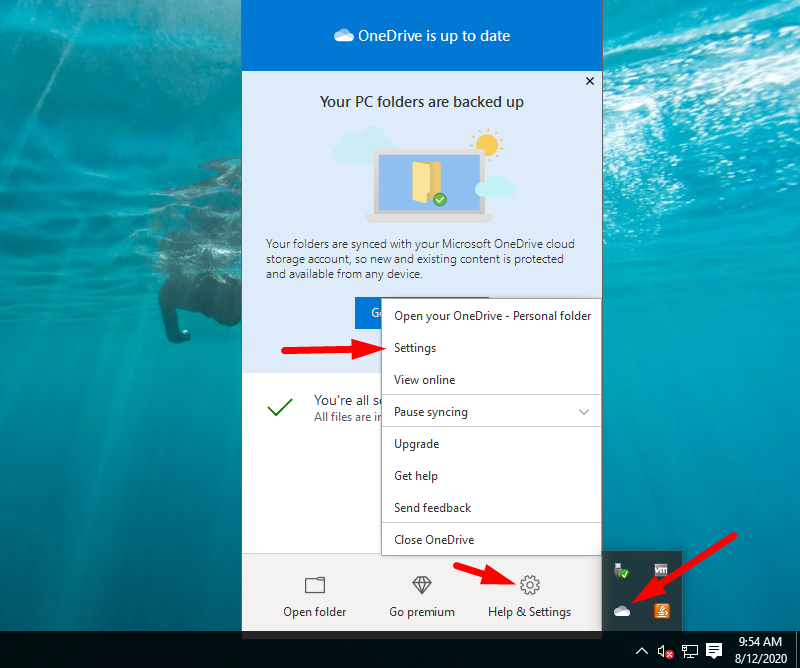
2. If you have an account signed in to OneDrive and want to add another account, click the OneDrive icon in the Windows taskbar notification area. Otherwise, use the Search field and type in “OneDrive”).
Select Help & Settings →
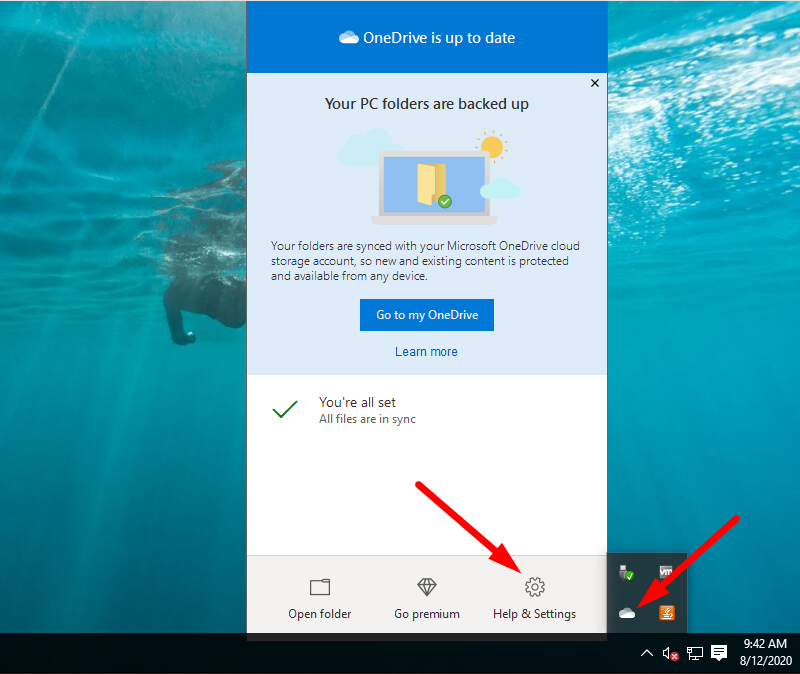
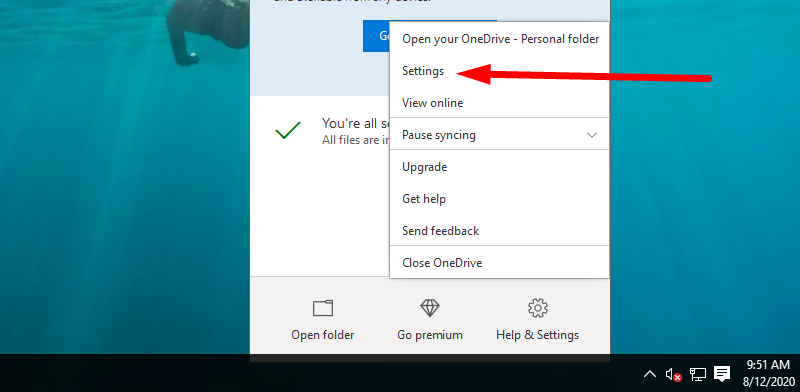
Choose Settings option in the context menu →

Choose Account tab and hit Add an account →
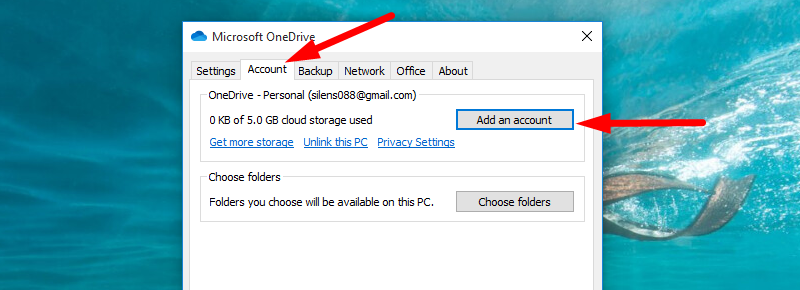
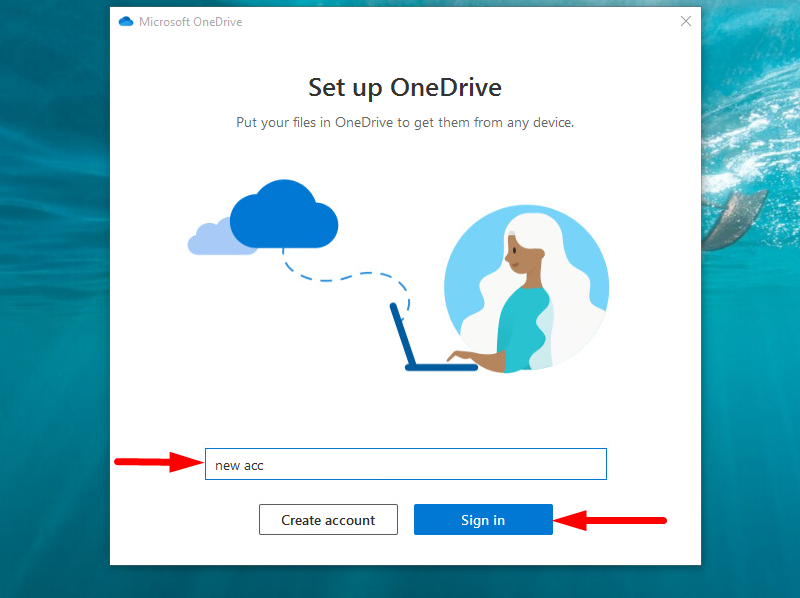
Enter your new account → Click Sign in
3. While setting up your OneDrive account, watch out for a few things: a folder where you store your OneDrive files and files can be marked as being on-demand. Files On-Demand are those that you can access without having to download all of them. This option uses storage space on your Windows device.
4. Your files will appear in the OneDrive folder in File Explorer on the left-hand side, where folders and drives are shown. In case you have more than one account, say one for school or work, then your files will appear in OneDrive — Personal and OneDrive — CompanyName. In this case, if your files are currently backing up on your Company’s account, then in the Windows taskbar, you’ll see a cloud icon with OneDrive — [CompanyName]. To change the folders:
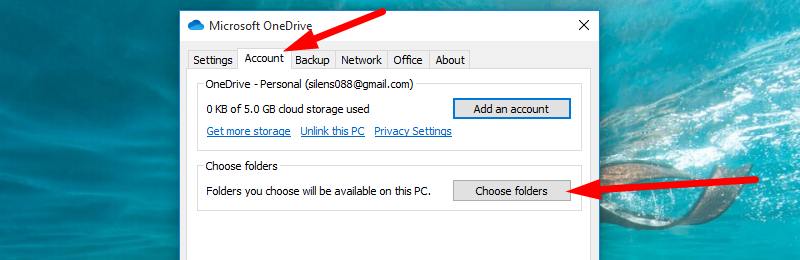
4.1 Right-click on the icon →
4.2 Select Settings →
4.3 Account → Choose folders
Now, you’re ready to set up your backup wizard:
4.4 Click on your OneDrive icon in the Windows Taskbar → Help & Settings →
4.5 Go to Backup tab → find Manage backup option
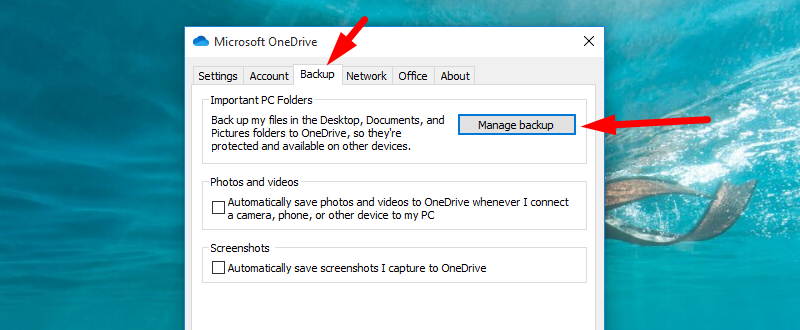
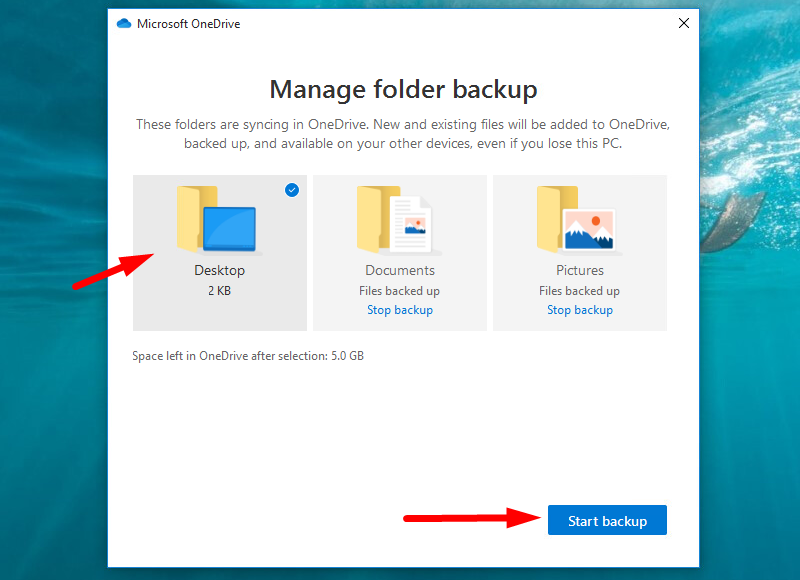
4.6 In Backup your folders, select folders you want to backup (Desktop, Pictures, or Documents)
4.7 Click Start backup. It might take a while, depending on how fast your internet connection upload speed is.
Restore Windows 10
To restore your files or folders:
1. Type “Restore files” in the search field on the taskbar, and then select “Restore your files with Files History”.

2. Find the file or folder you wish to restore and use arrows to see all available versions.
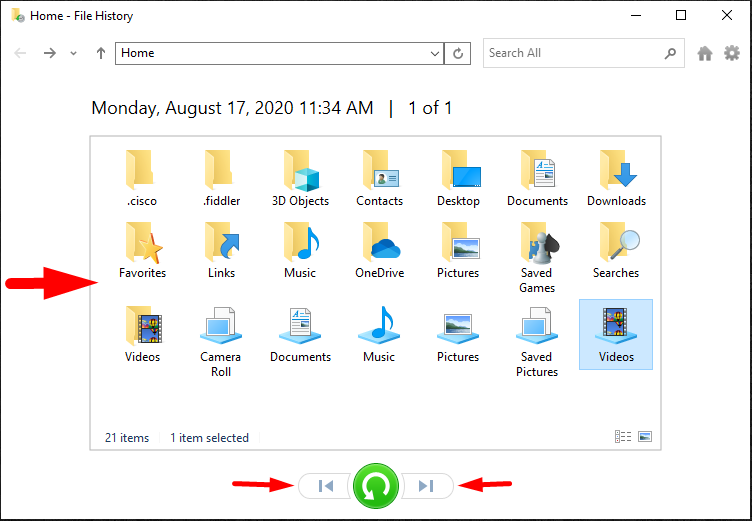
3. Choose the version you want to restore
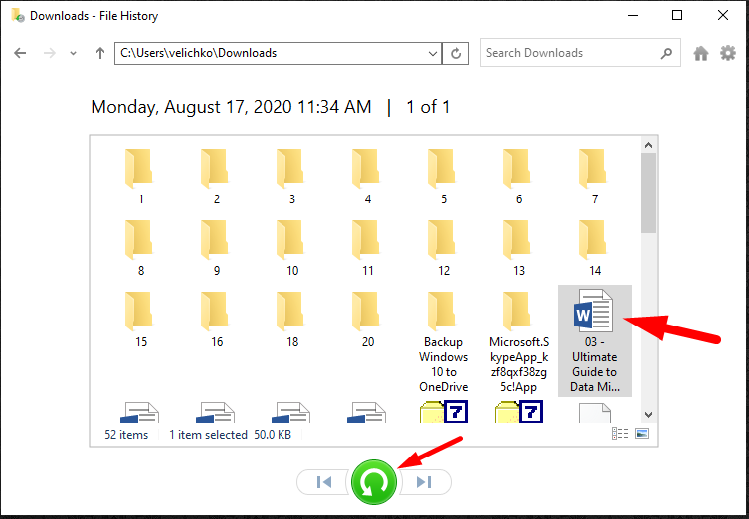
4. Select “Restore” to save it in its original location.

5. If you want to save it in a different location, right-click Restore, select Restore, and then choose a new location.
In case you used a Backup and Restore utility in previous versions of Windows, you can still restore them in Windows 10.
Go to Control Panel →
Select System and Security →
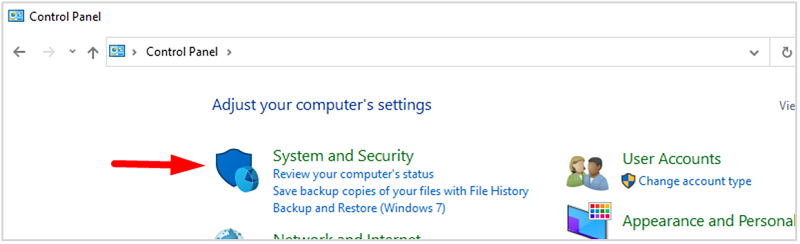
Backup and Restore (Windows 7) – as noted, it says Windows 7, but it works in Windows 10.

Windows 10 backup is not working: The Troubleshooting Guide
Suppose you find yourself in a predicament where the Windows 10 File History backup tool isn’t working. In that case, here are a few reasons why this might be the case and the solutions you can implement to fix those problems.
First, make sure File History and Windows search are available. To check if they are, follow the steps:
- Enter Services in the search field in the Windows Taskbar
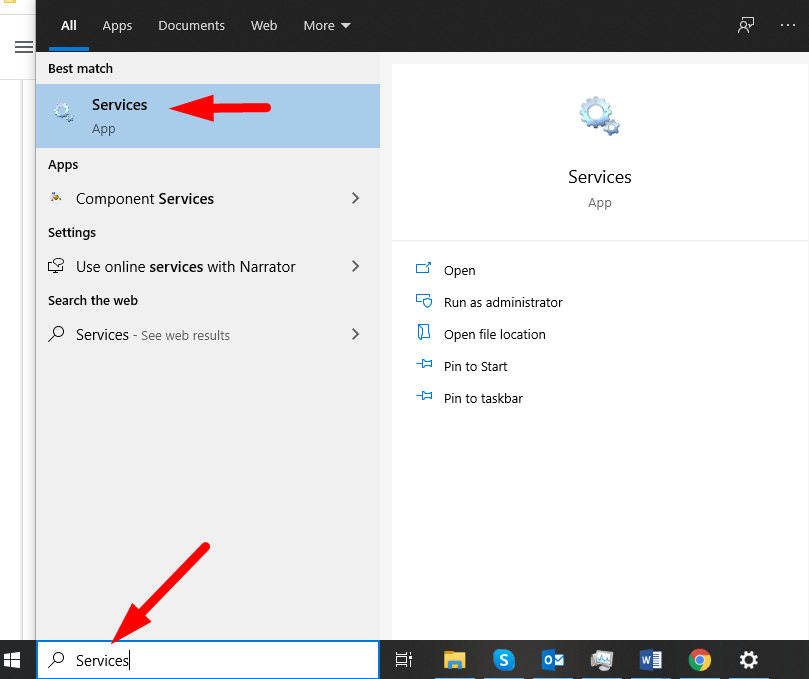
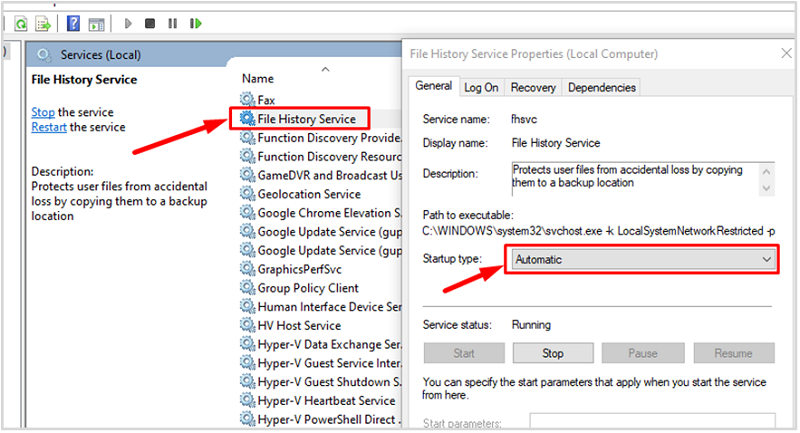
- Look for File History Service and Windows Search and make sure those are set to Automatic.
Second, enable the system protection feature:
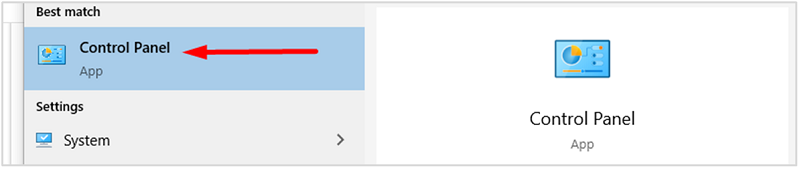
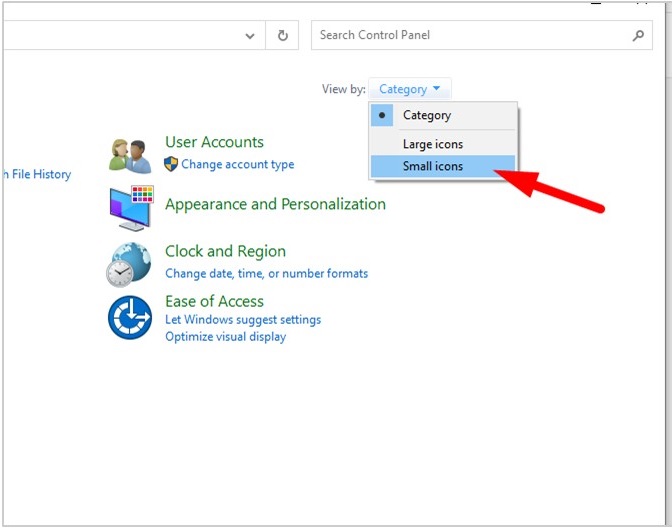
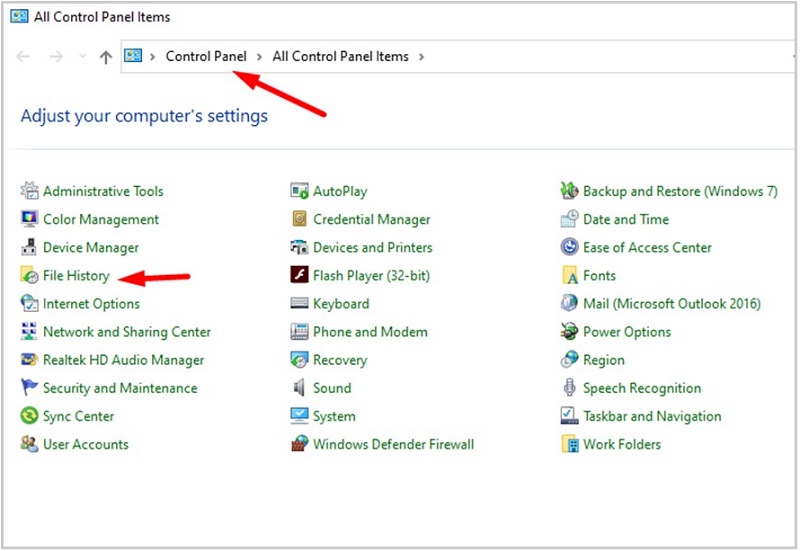
- Search for Control Panel in the search field in the Windows Taskbar
- Look for System (click “View by Small Icons” in the top-right corner)
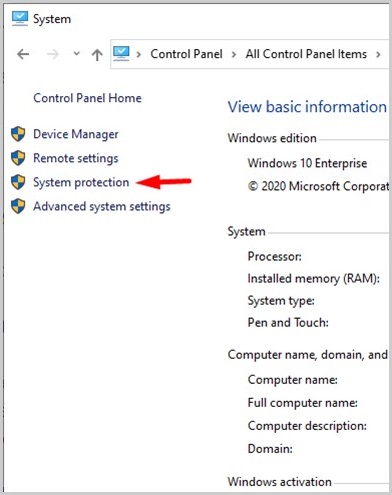
- Choose System Protection on the left-hand side of the screen
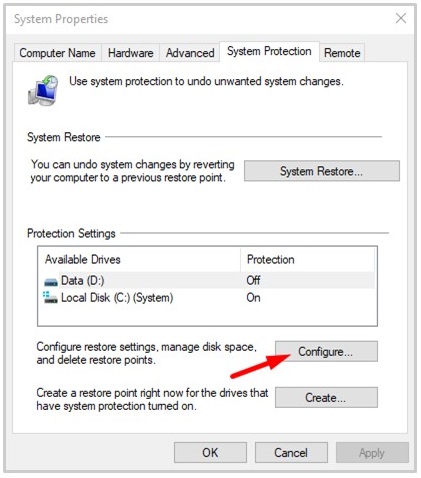
- Select a drive and click on Configure
- In the Restore settings, choose Disable system protection and click Apply
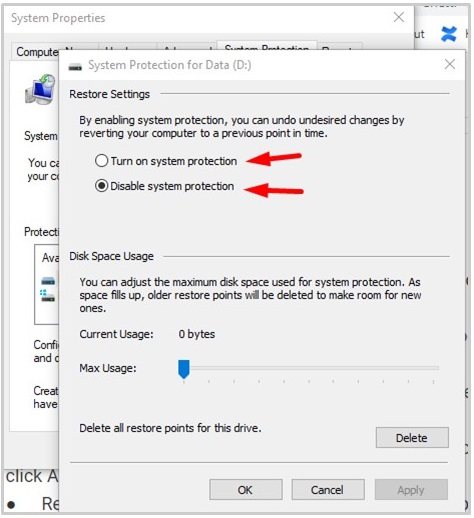
- Then, repeat the above steps and choose “Turn on system protection”
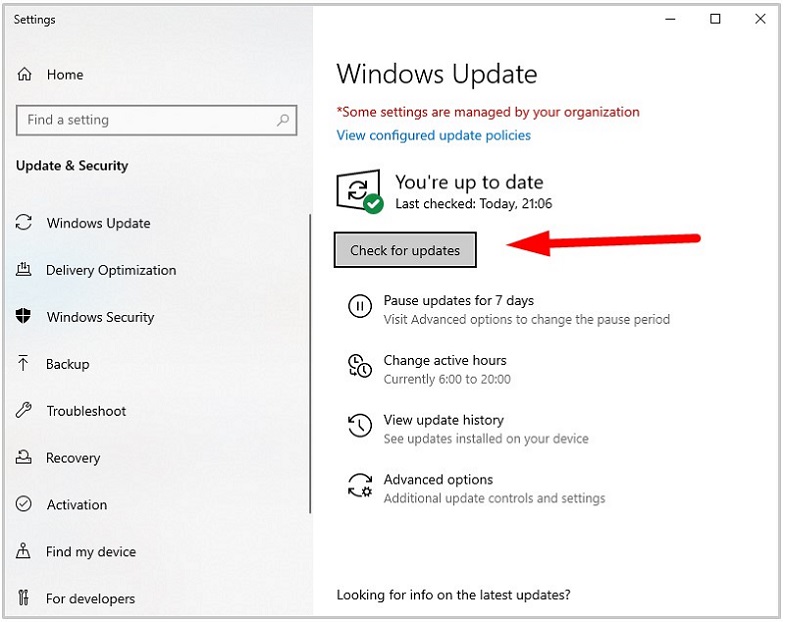
Third, it might be the case that you don’t have the latest version of Windows. In that case, you’ll need to update it:
- Search for “Check for updates” in the search field, then click on it on the right-hand side of the screen
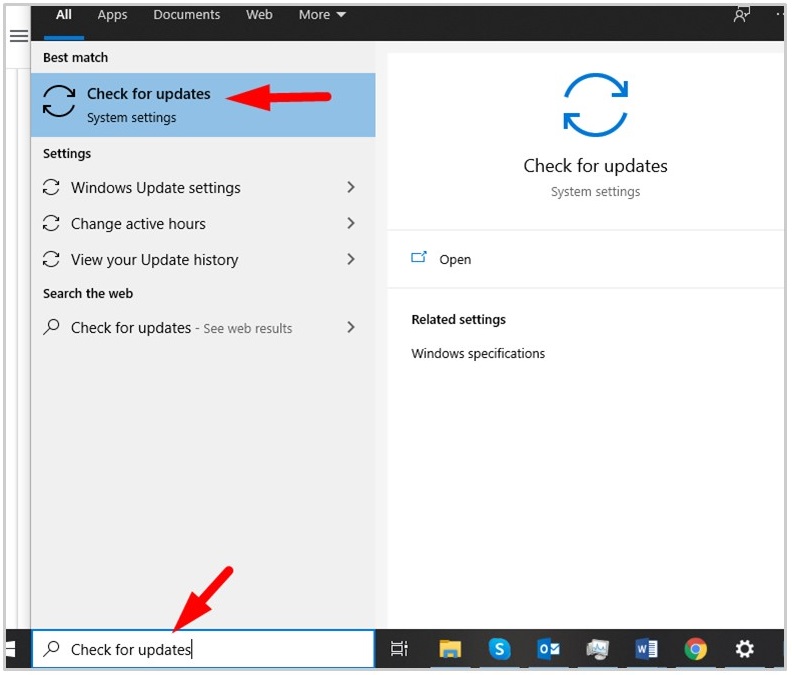
- if there are Updates available, click on Download and install.
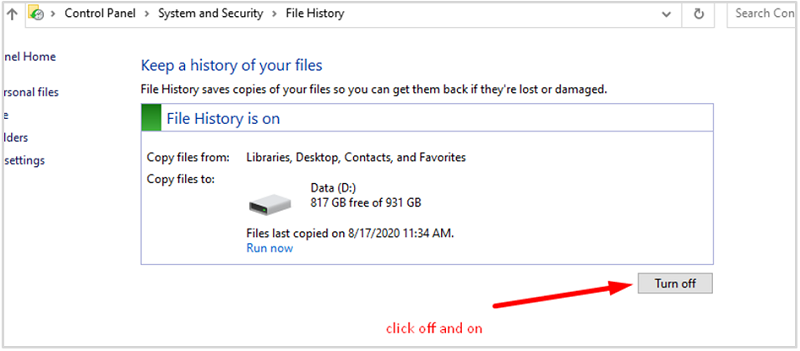
Fourth, Windows can fail to back up all necessary files. In this case, it’s best to turn off File History and enable it again:
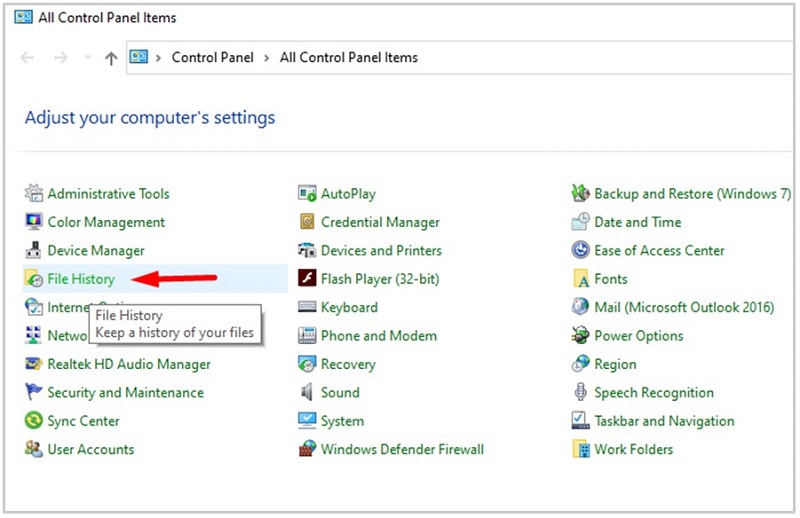
- Search for the Control Panel in the search field →
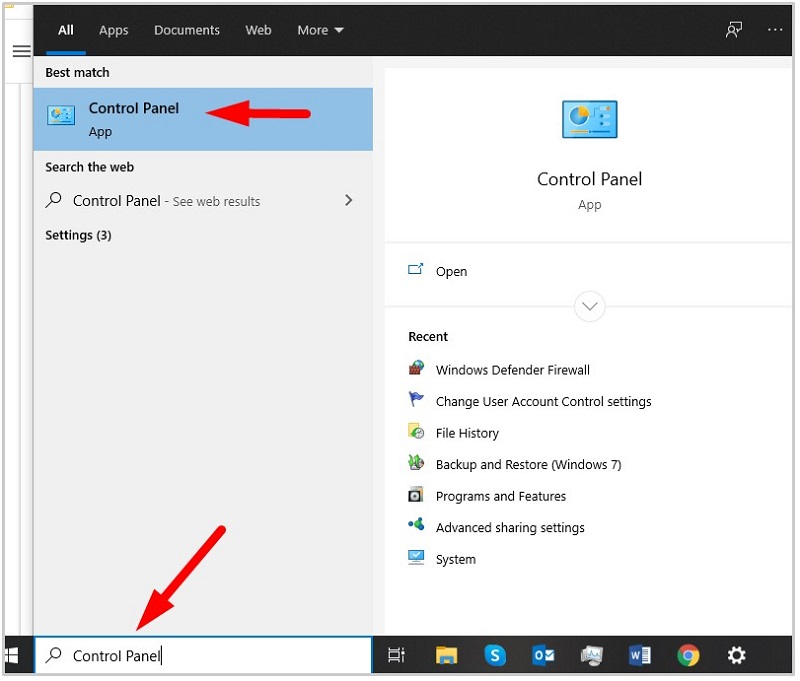
- Go to File History →
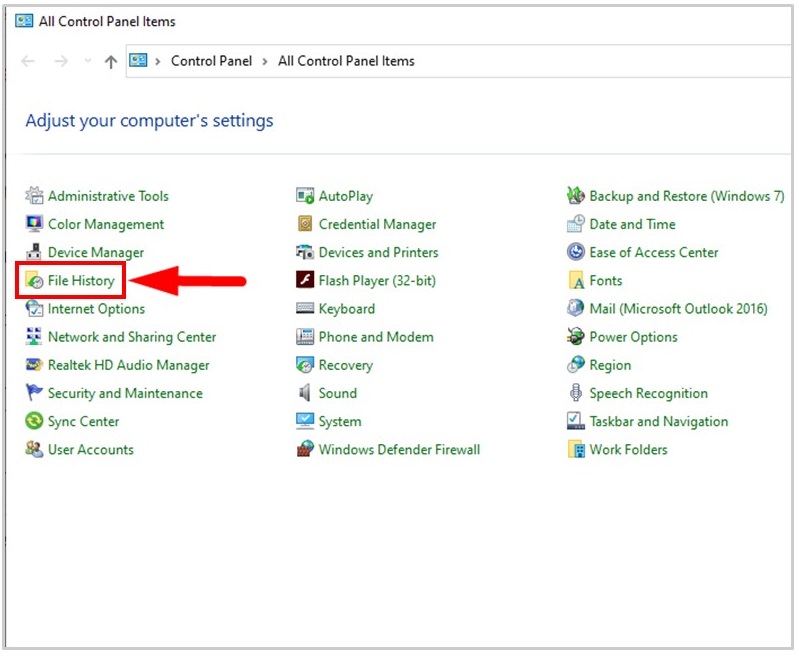
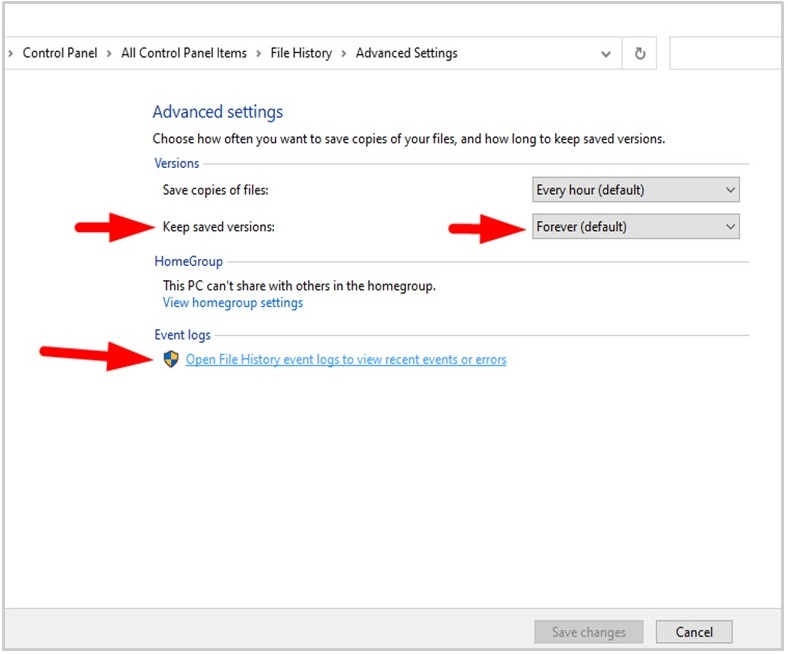
- Advanced Settings →
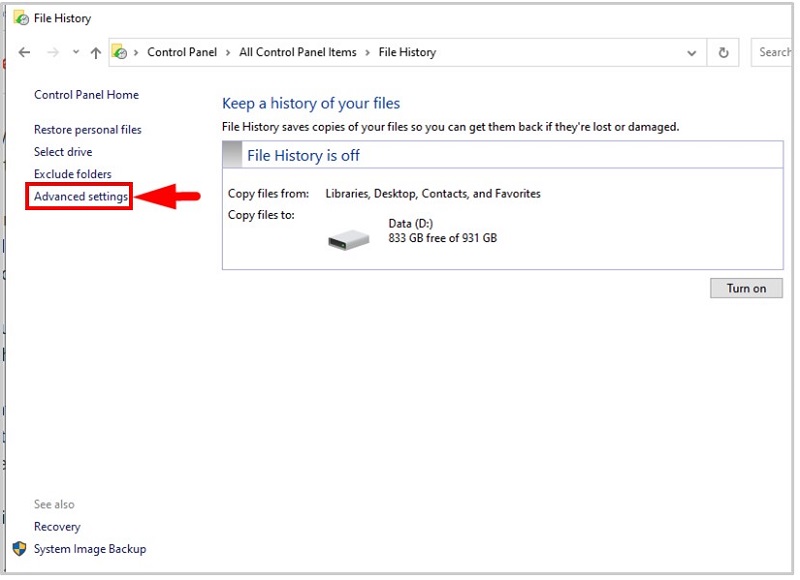
- Check the Event Logs and make sure Keep saved versions are set to Forever
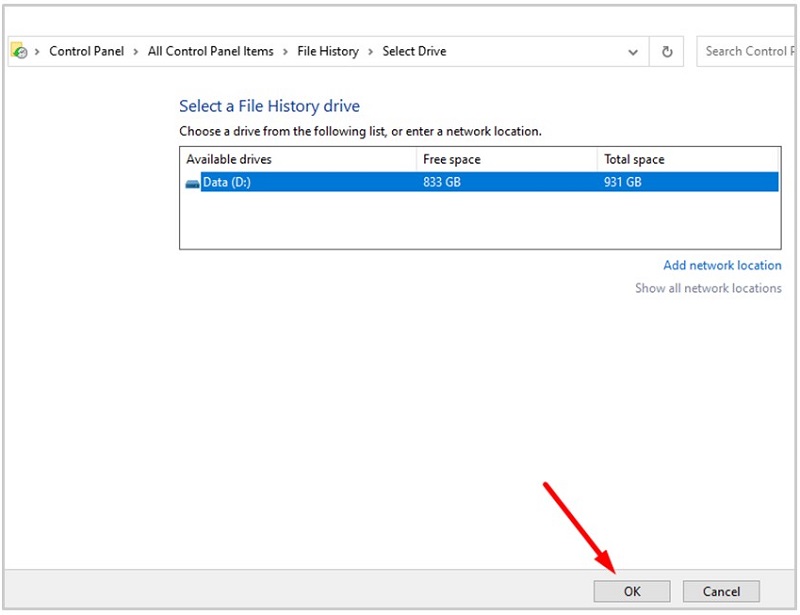
Fifth, your file history backup tool might not recognize your external drive. When this happens, follow the steps:
- Control panel → File History
- On the left-hand panel, Select drive
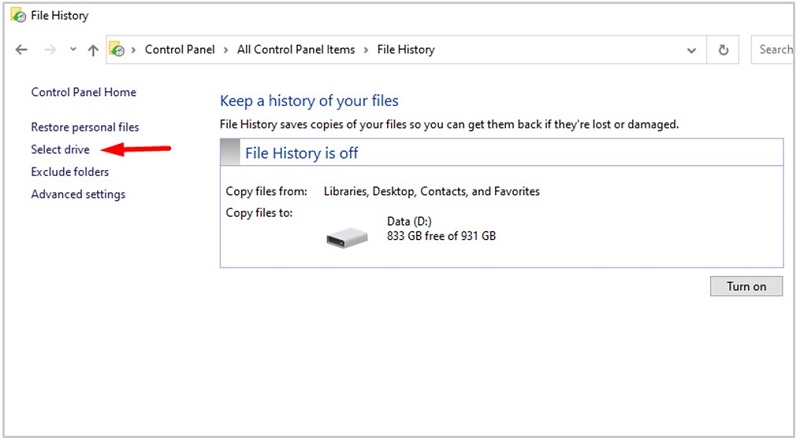
- Select a new drive and click Ok to save
Sixth, the Windows 10 backup file history tool might need a reset.
To do that, you’ll need to Stop File History and start it again. Go to C:\Users\[YourUserName]\AppData\Local\Microsoft\Windows\FileHistory\Configuration →
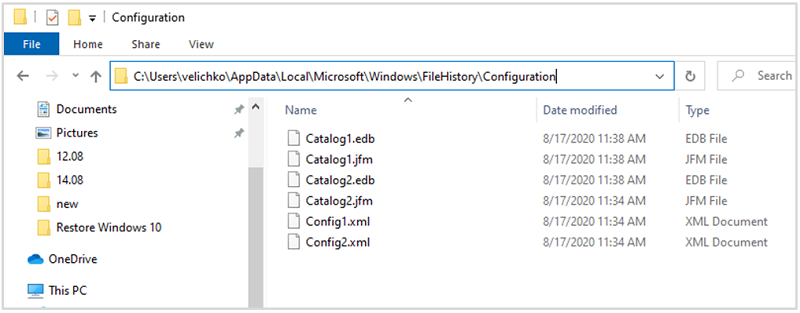
Restart File History →
Do the same backup as before.
While creating a system’s image, you might also get a few errors. Possible solutions to these are changing the old backup folder’s name or choosing the proper Windows system backup destination. Let’s briefly outline the steps to take in each of those cases.
1. Change the name of the old backup folder
2. Go to Control Panel → File History
3. Double click the Windows 10 Backup and restore program, follow the path, and find folder “WindowsImageBackup”
4. Rename the folder; if you don’t wish to rename it, move it to another hard drive because the old backup image might cause a backup failure.
5. Choose a proper Windows system backup destination
When the destination for a backup is corrupted, it’s bound to lead to backup failure. Therefore, try changing the destination [choose another hard drive, allocate a new partition, or format the destination partition in the external drive]
Get Windows System Backup Software [choose any you see fit from the section above]
Backup Windows Server 2016: the detailed instructions
There are a few ways to back up Windows Server 2016. What follows will require the installation of the Windows Server Backup utility first.
These are the steps on how to install the utility:
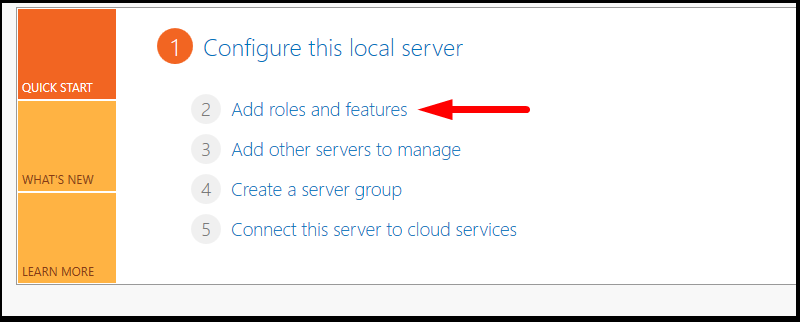
- Open Server Manager
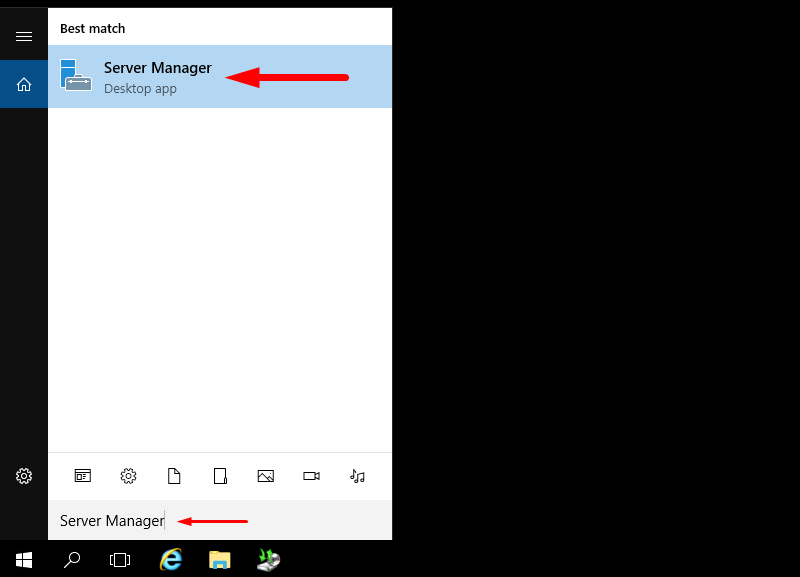
and click on Add roles and features
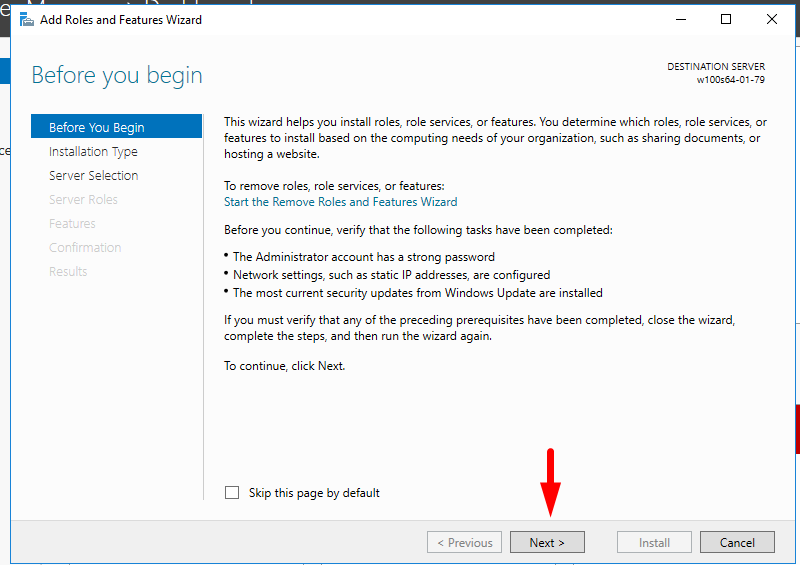
- Read ‘Before you begin’ and click Next
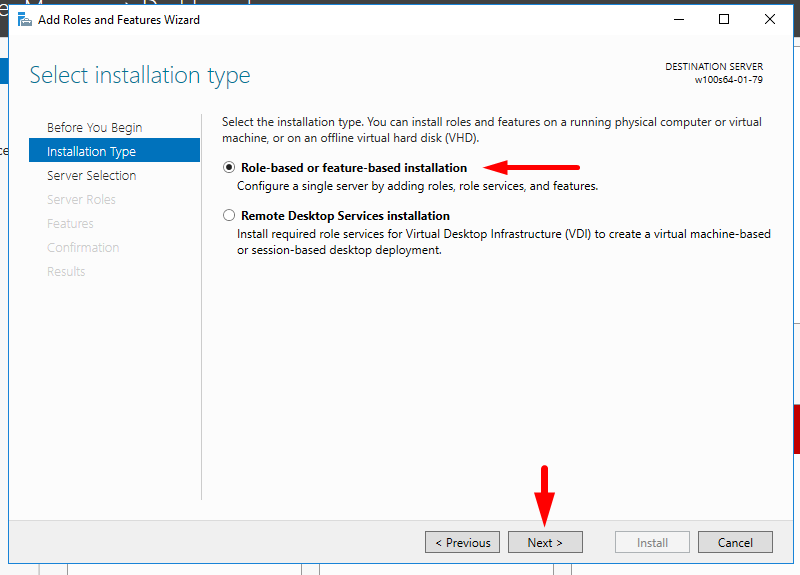
- Choose Role-based or Feature-based installation (or leave the default)
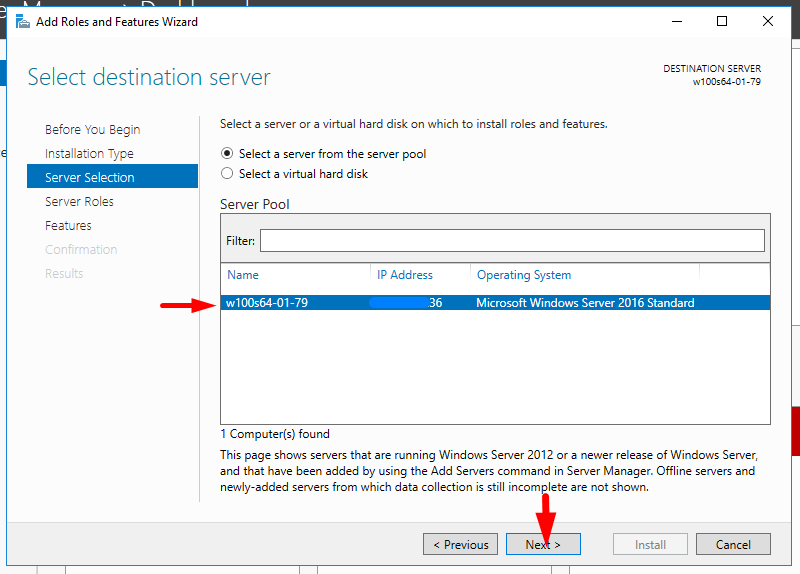
- Choose the server you want to back up to and click Next (or leave the default)
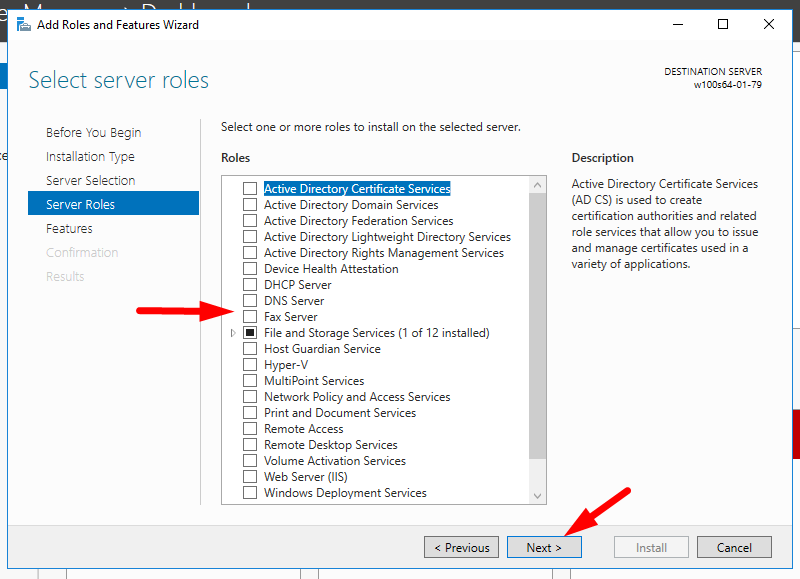
- Check the boxes to select the server roles (or leave the default)
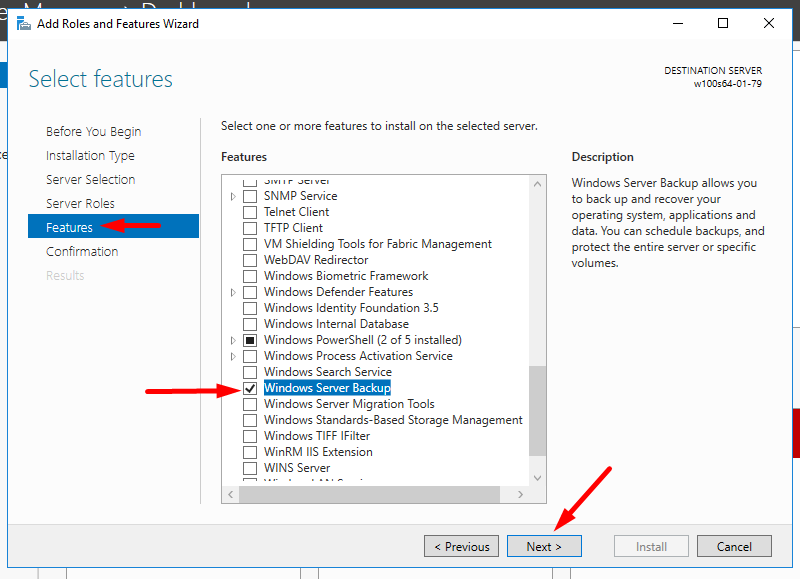
- In the Features list, choose Windows Server Backup
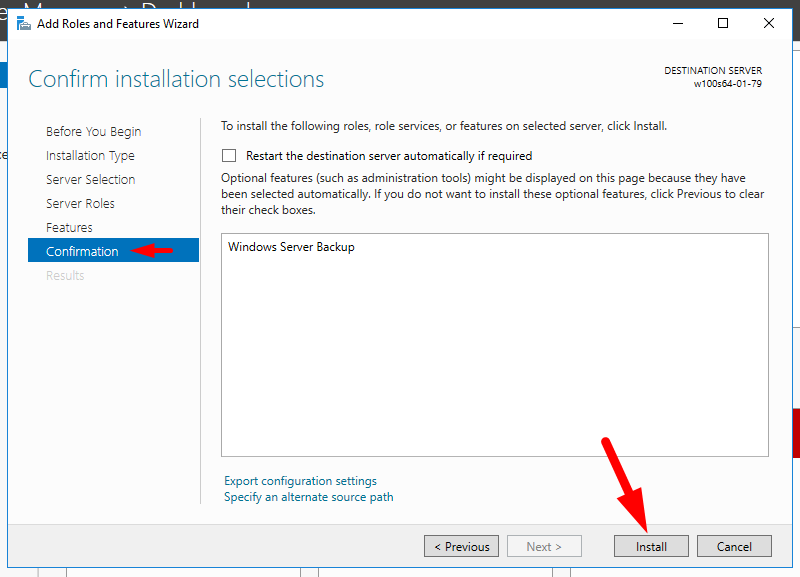
- Click Install and start the installation process
Once installed, launch the utility from Server Manager → Tools
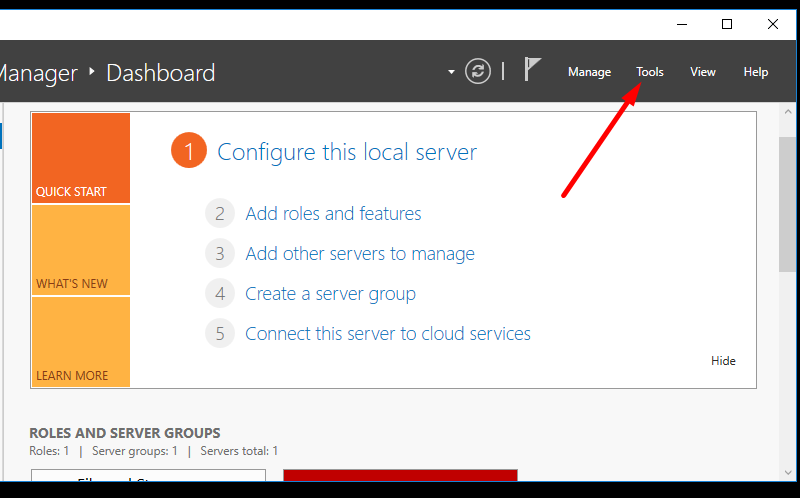
→ Windows Server Backup to open up Windows Server Backup Console,
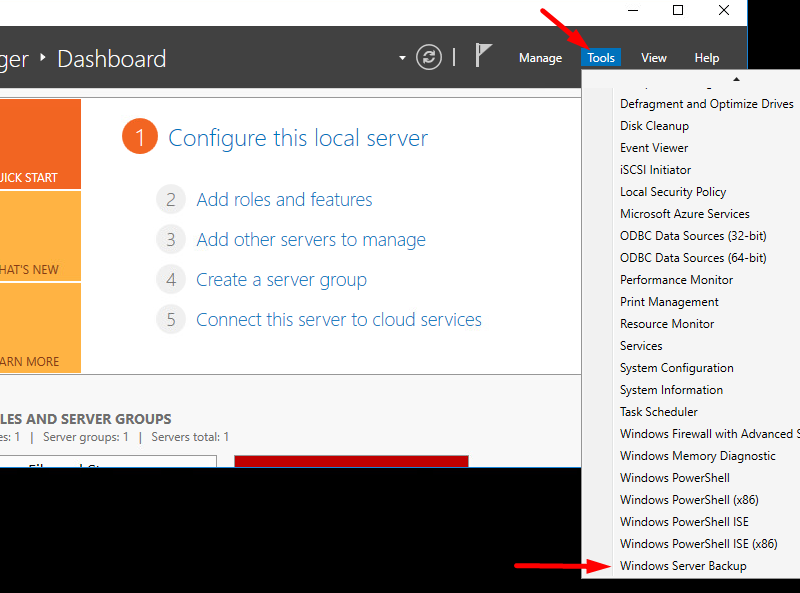
then proceed as follows:
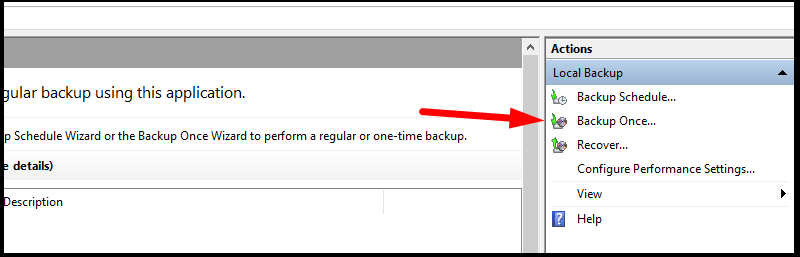
- Under Actions choose Backup Once…
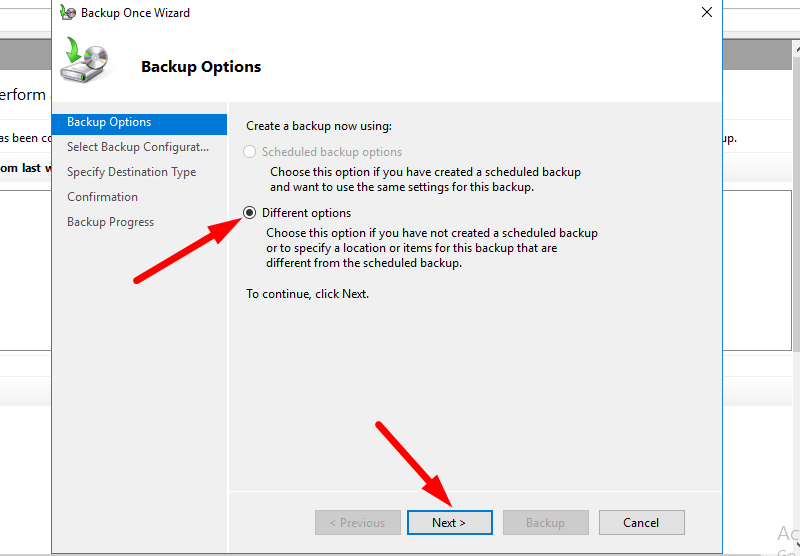
- On the Backup Options page, choose Different Options and click Next
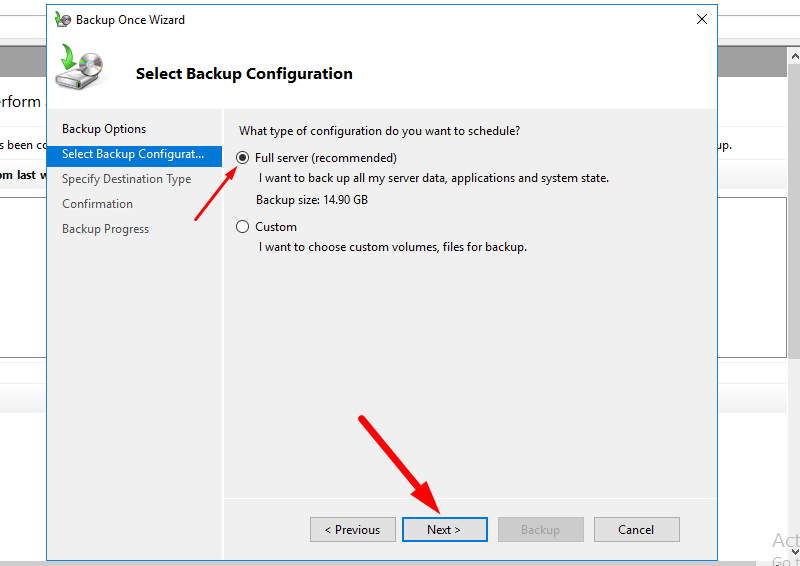
- On the Select Backup Configuration page choose the type of configuration you want to schedule, either Full Server or Custom. If you choose Full Server, you’ll back up all files.
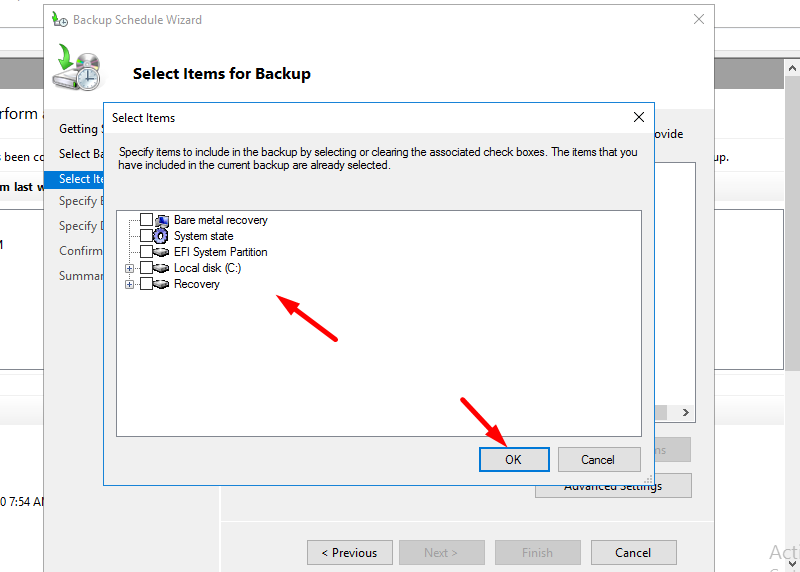
- If you choose Custom,
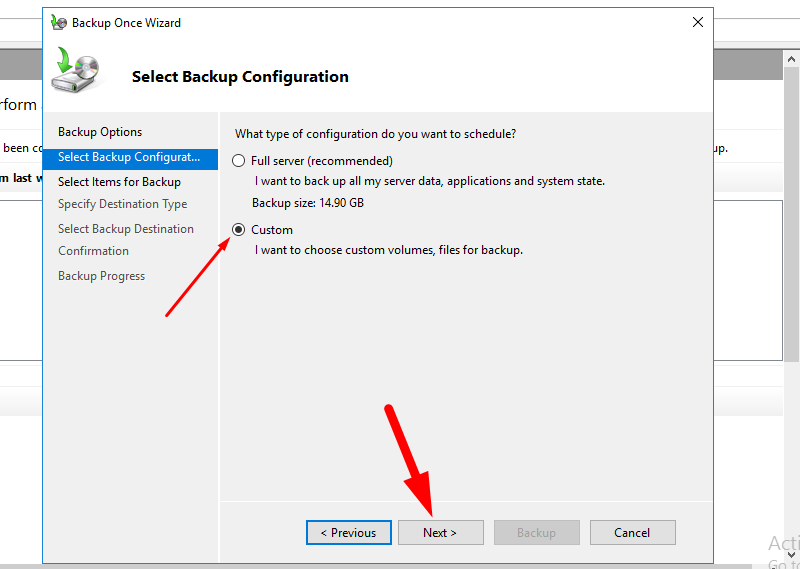
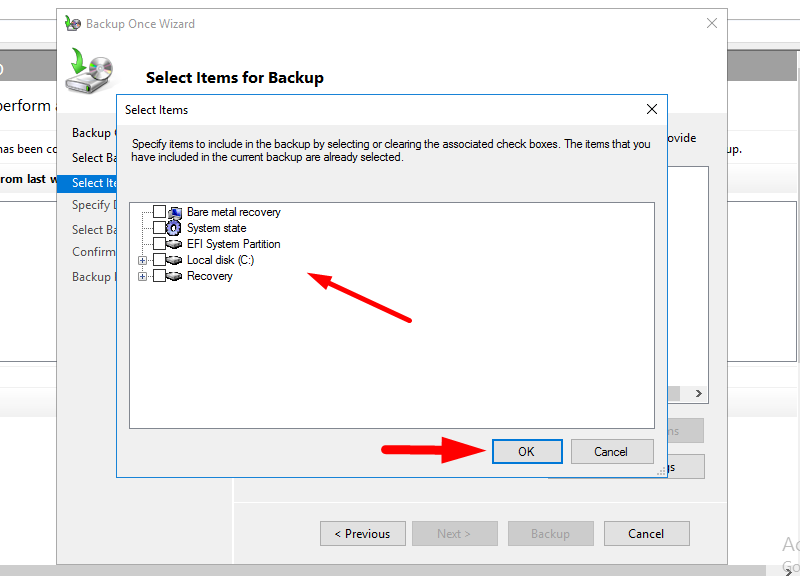
you’ll be prompted to select individual folders and volumes to back up on the Select Items for Backup page, where you can click Add Items
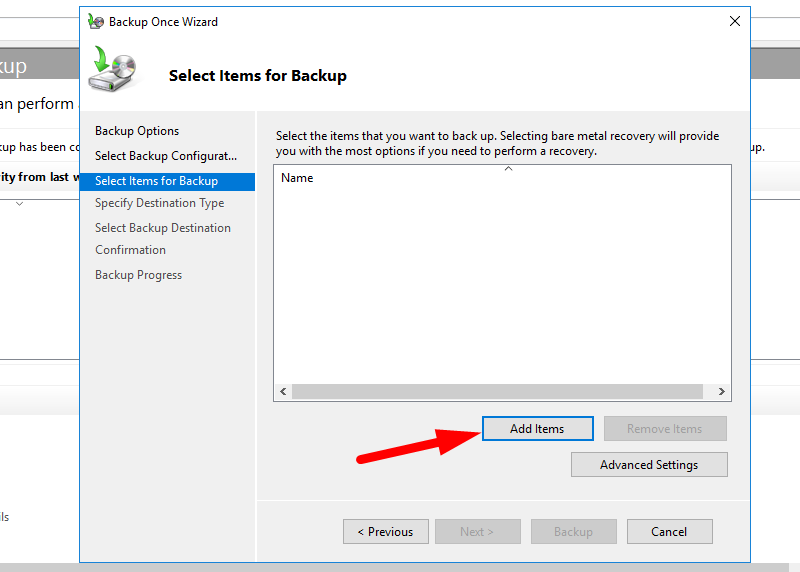
and choose your preferred items → Click Ok.
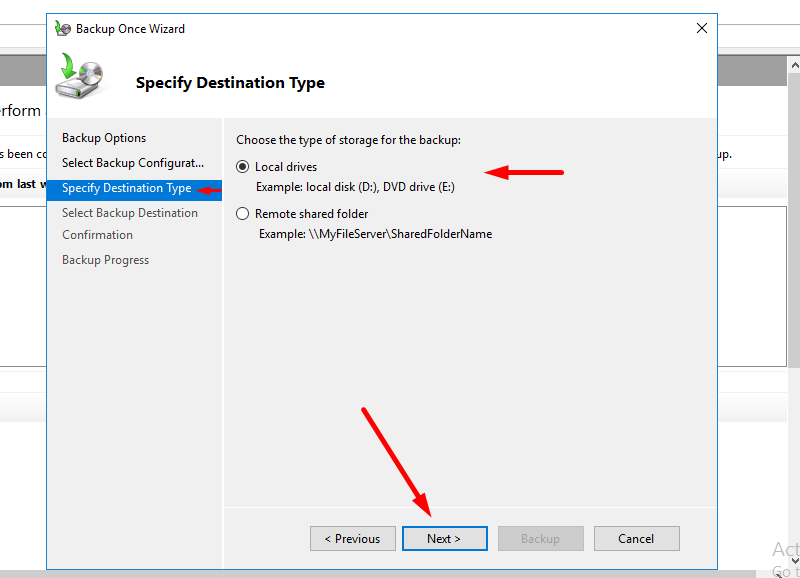
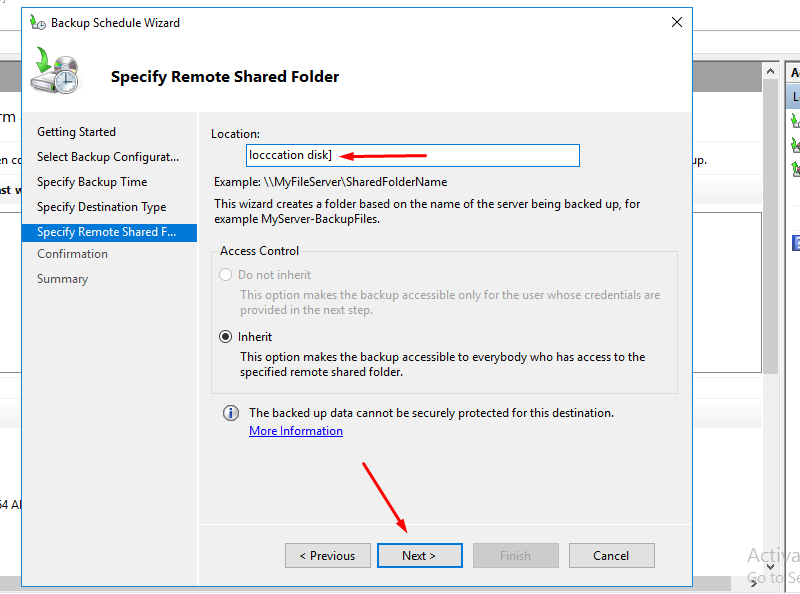
- You may fumble around with the advanced settings and add exclusions, otherwise just move further to Specify Destination Type.
- On the Specify Destination Type page, identify where you want to put the backup, either a Local drive or Remote shared folder → Click Next
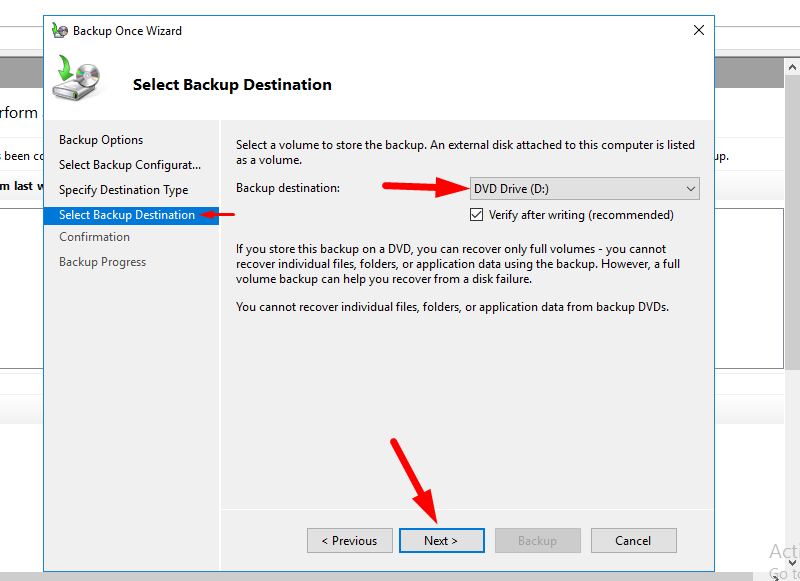
- On the Select Backup Destination, choose your destination, in case you chose Local drive in the previous step, then specify which drive you want to backup to (for example, disk D) → Click Next
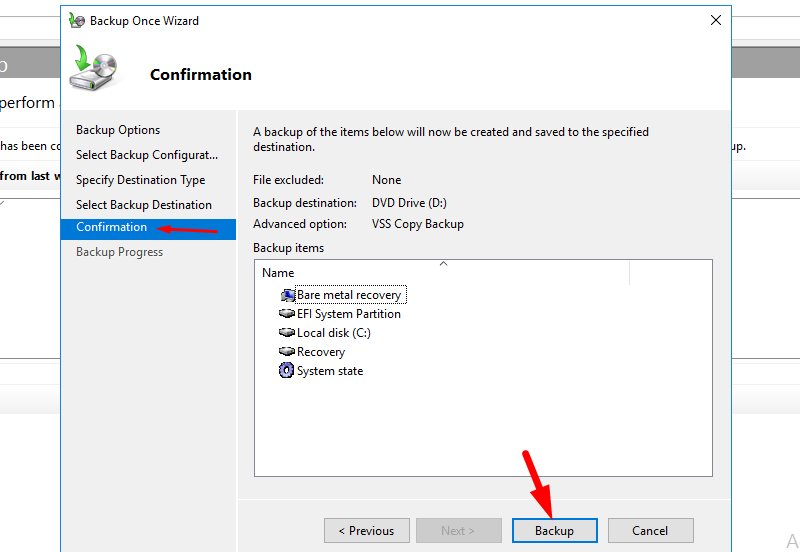
- On the Confirmation page, click Backup.
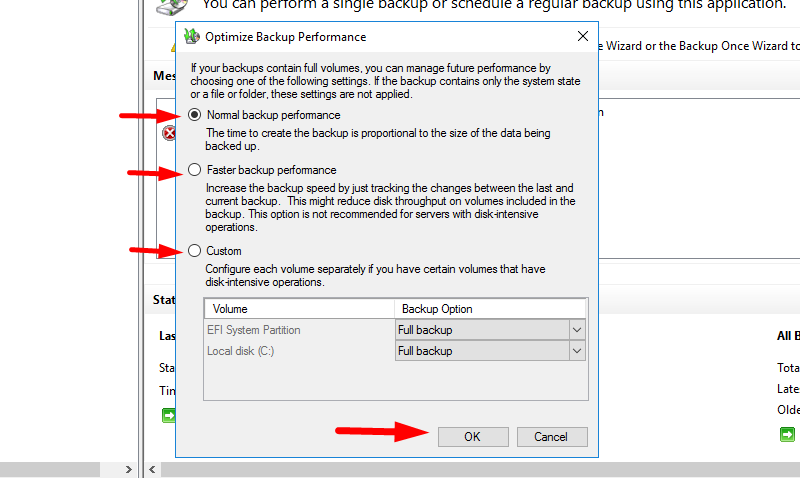
After you back up your Windows Server, you can fine-tune your future backups and optimize the backup performance. To do that, follow the steps:
- Go to Actions pane and choose Configure Performance Settings
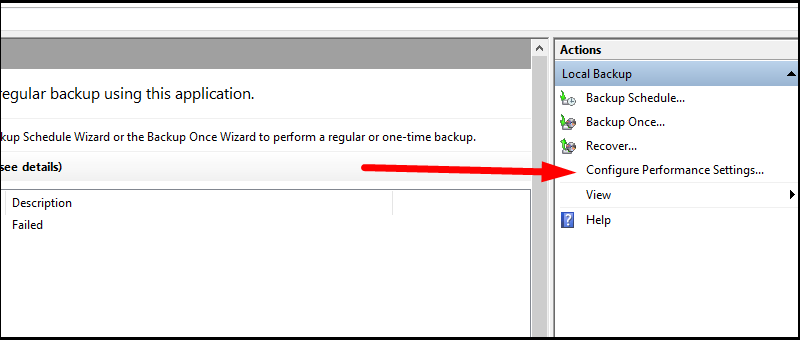
- When the Optimize Backup Performance page opens, choose to back up Windows Server incrementally (choose Faster backup performance), perform full backups (choose Normal backup performance), or customize your backup experience (choose Custom).
To run the Windows Server backup on schedule, follow the steps:
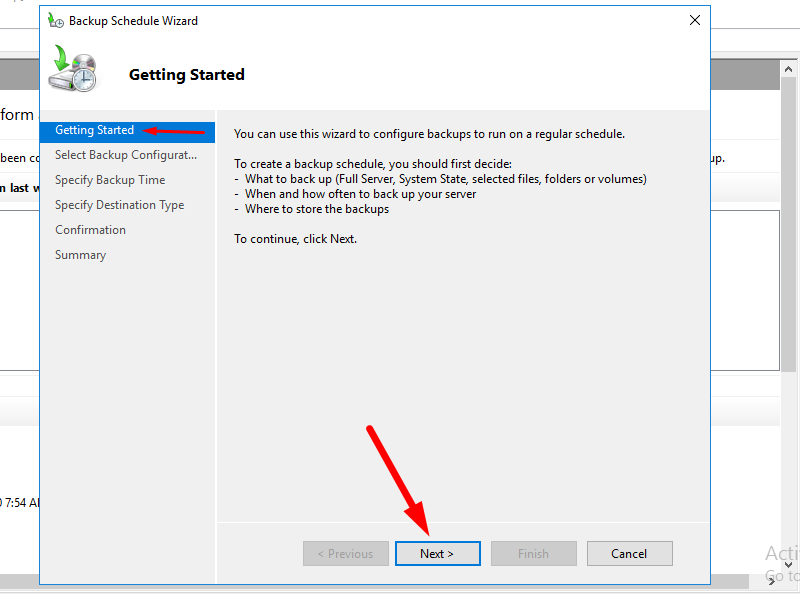
- Go to the Windows Server Backup Console and under Actions pane click Backup Schedule,
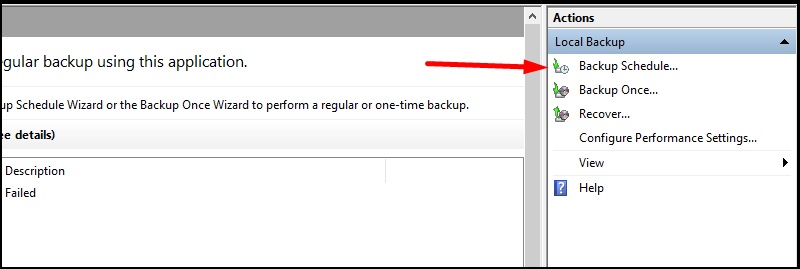
which will prompt Getting Started Wizard up
- On the left-hand side of the window, choose Select Backup Configuration → Choose either Full server or Custom.
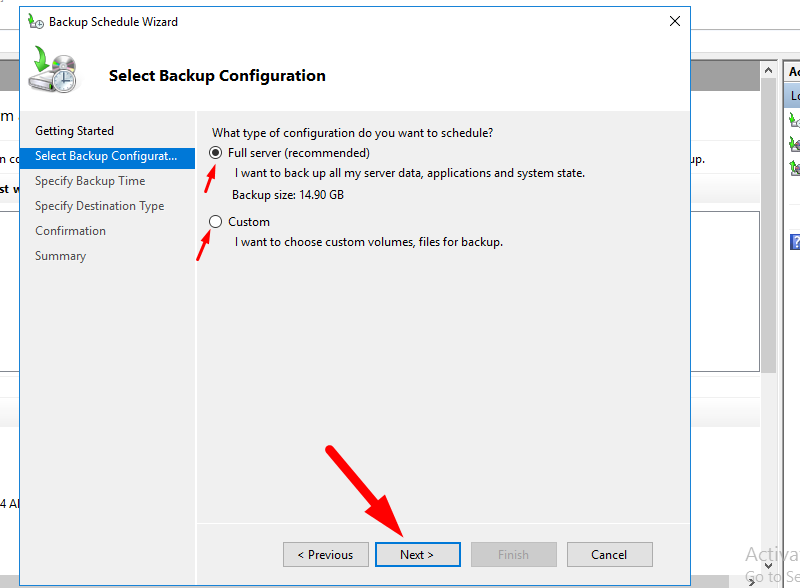
- If you choose Custom,
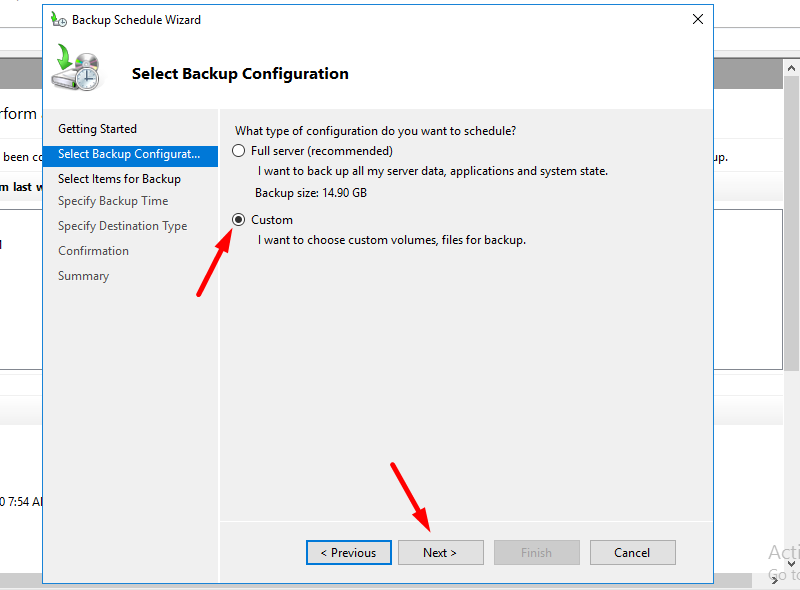
then on the Select Items for Backup page, click Add items
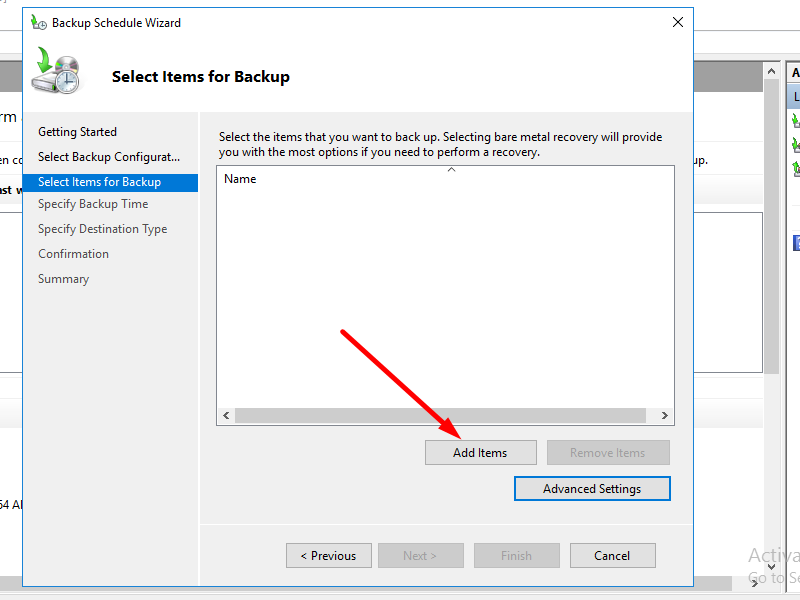
and choose items for backup,
when done, click Next
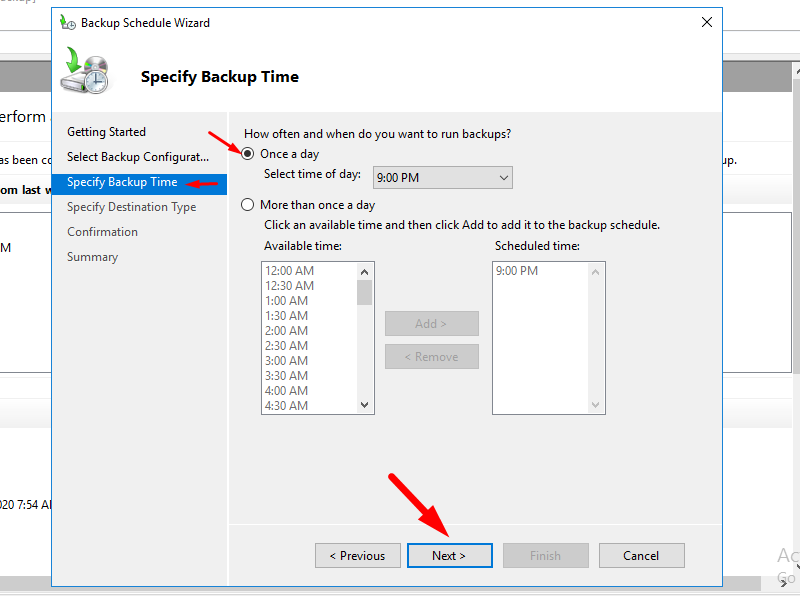
- On Specify Backup Time page, choose the schedule times (Once a day or More than once a day) → Click Next
- On Specify Destination Type page, click on Back up to a hard disk that is dedicated for backups (recommended) if it shows up in the list on the right, if not, then click on Show All Available Disks and select the box next to the disk you want to use to store your backups → Click Ok [Other available options for the Destination Type include Backup to Volume and Backup to a shared network folder]
- On Specify Destination Disk, select the checkbox for the disk again
- On the Confirmation page select Finish.
Windows 10 backup software: What to look for?
If you’re overwhelmed by the number of backup software tools available on the market — you’re not alone. It’s best not to over-buy and spend money on features you’ll never need. Below, we’ve mentioned a few things that you actually should consider.
- File backup works if you want to back up only some data as opposed to the entire system
- Imaging is a byte-by-byte snapshot of your HDD or SSD that works if you want or need to restore your entire system in case of data loss, malware attack, or system crash
- A bootable optical disc or USB thumb drive should be created in case your system crashes, and you need an alternate way to boot and run the recovery software. Some software creates a restore partition on your HDD or SSD, which can be used instead of the internal HDD or SSD is still operational.
- Versioning is when a backup program allows you to retain previous backups or previous file versions [for synching or mirroring]
- Cloud/online support is perfect for off-site backup as a hedge against natural and physical disasters.
- FTP & SMB/AFP: backing up to other computers or NAS boxes is another way to safeguard your data off-site. FTP for off-site, SMB (Windows and most OS), and AFP (Apple) for other PCs or NAS on your local network.
- Scheduling is an important feature for all regular backups
- Real-time backups (sometimes also referred to as mirroring) happen when backing up occurs whenever a file changes
- Continuous backup happens on a tight schedule, for example, every 5 or 10 minutes. Continuous backup suits rapidly changing data sets or when other impeding factors do not allow for real-time backups. These can include computing power is too low or transfer rates are too slow.
- Performance matters if you’re backing up very large data sets, multiple machines, or to multiple destinations (usually found in an enterprise-based setting).
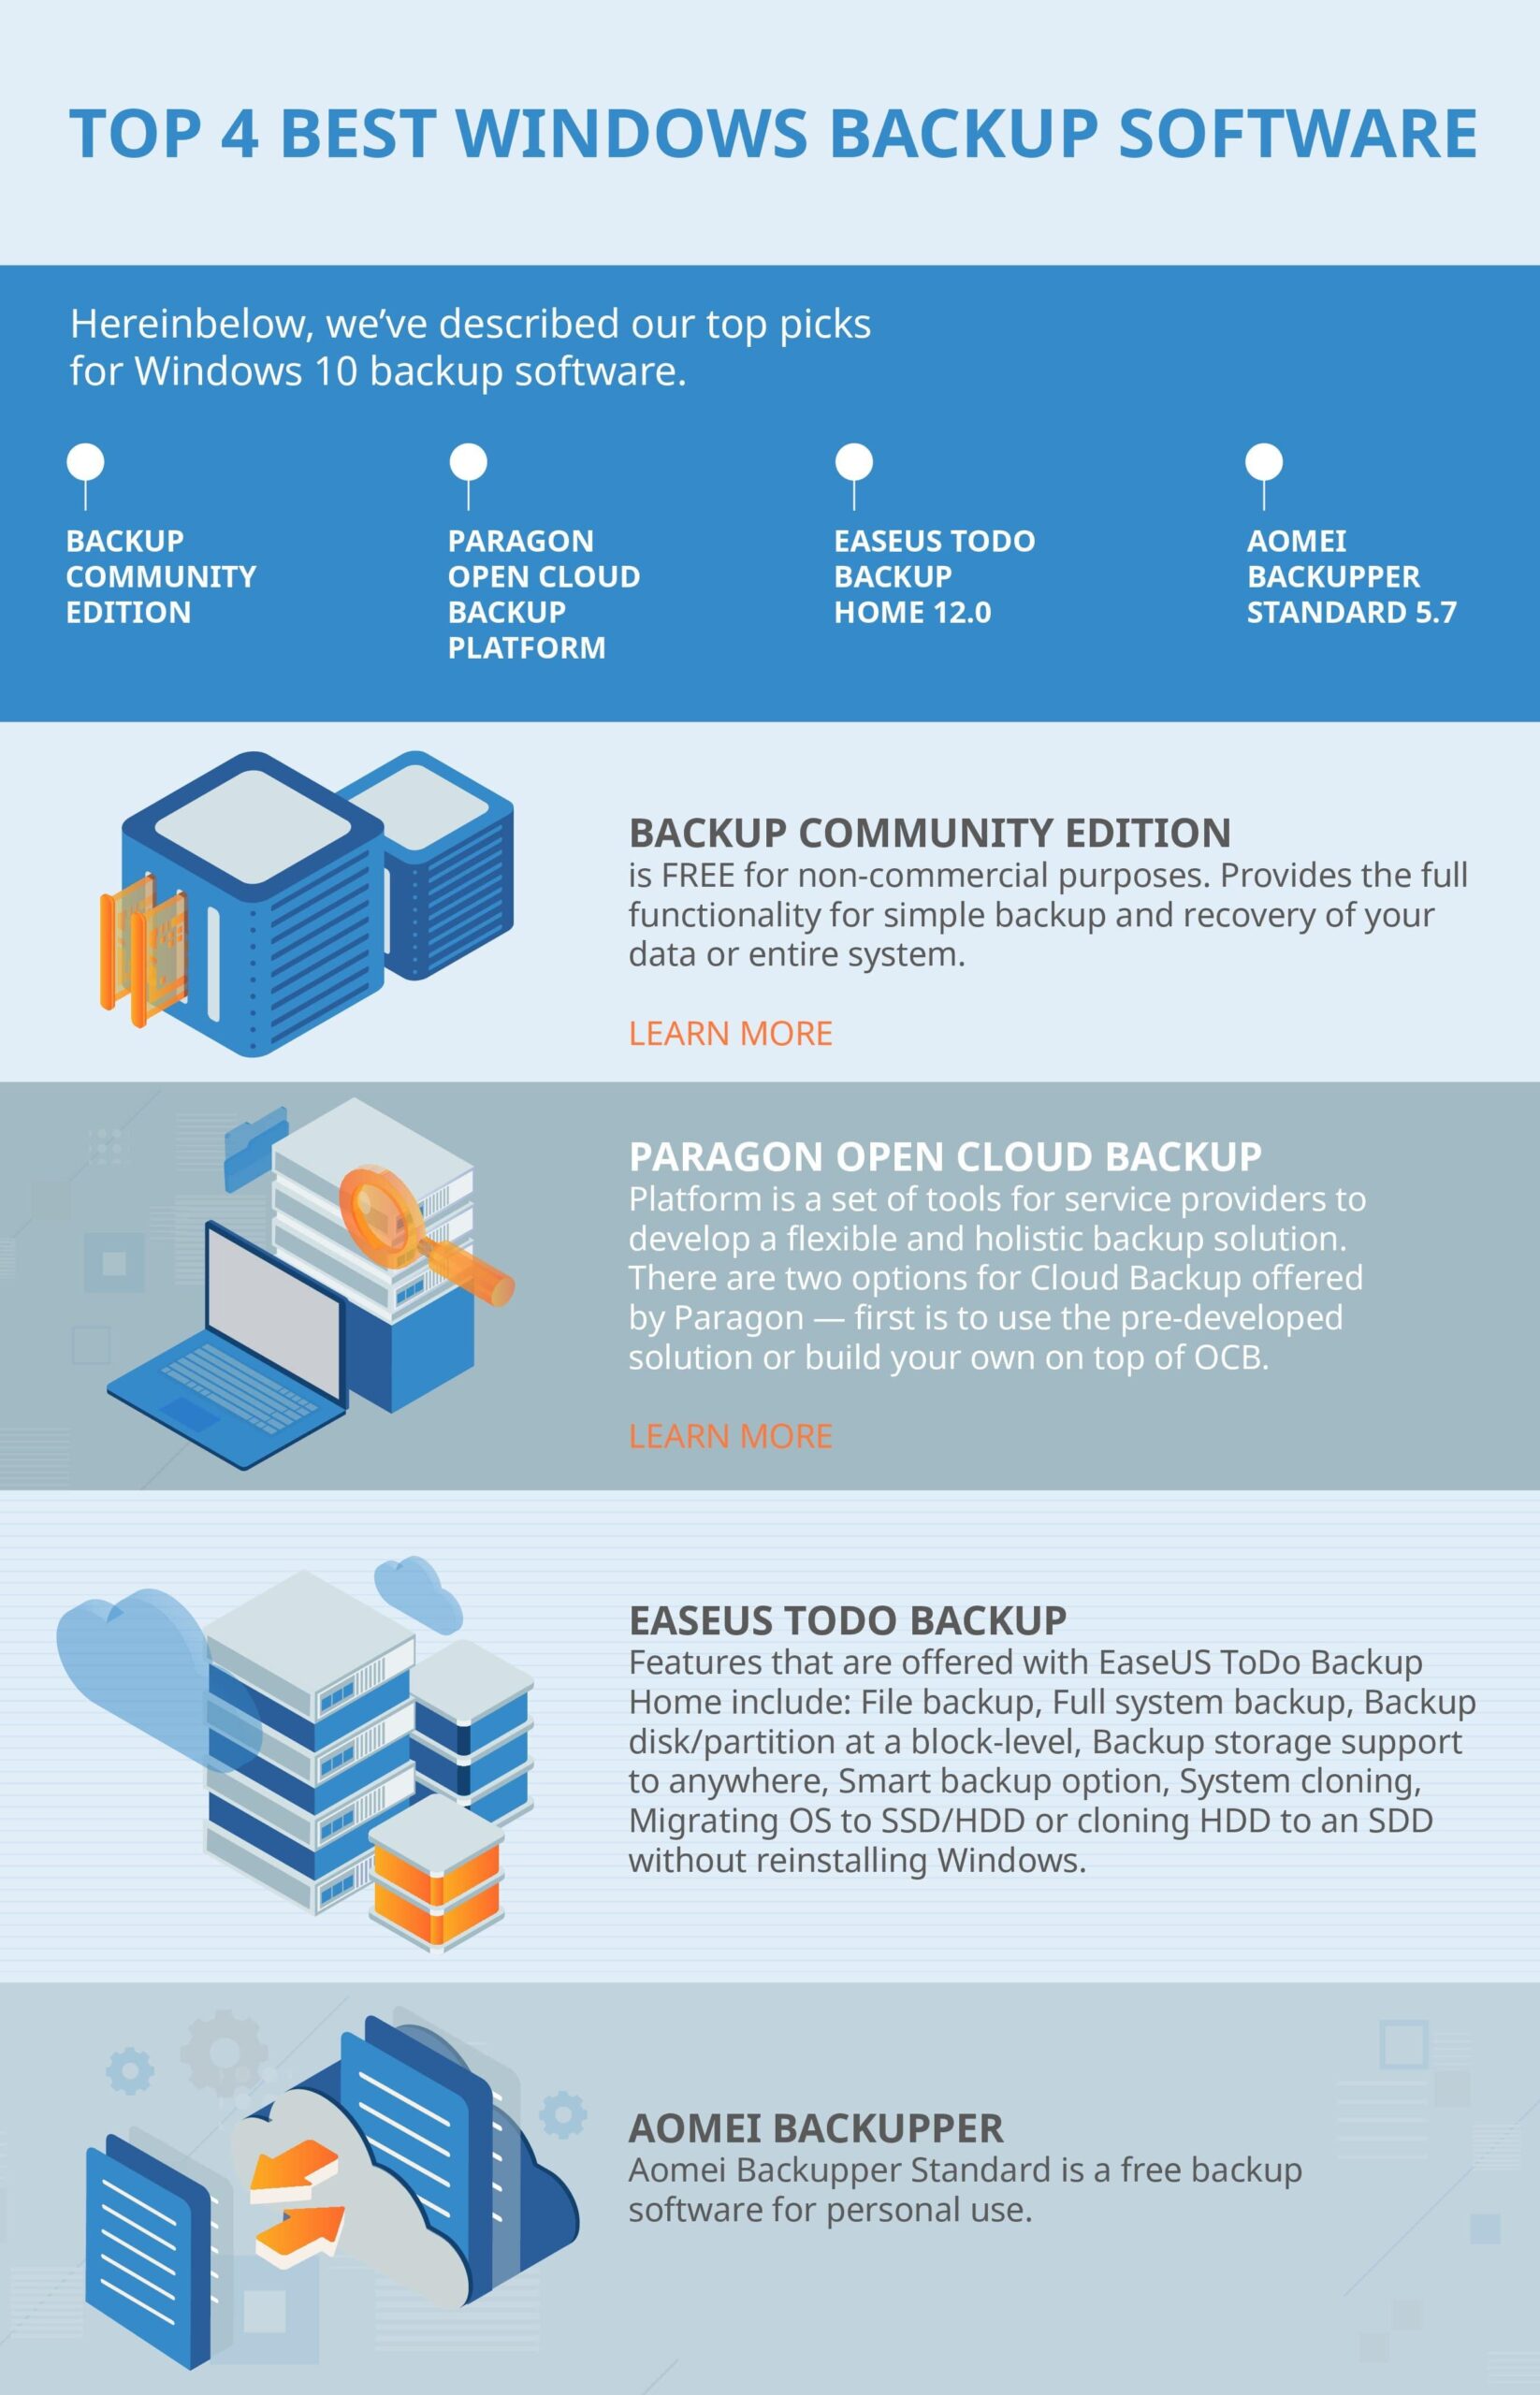
Best Windows Backup Software: TOP 4 applications
Here are our top picks for Windows 10 backup solutions:
Paragon solutions: Paragon Backup & Recovery Community Edition + Paragon Open Cloud Backup Platform
Paragon’s Community Edition is available free of charge for non-commercial purposes only. If you’re interested in purchasing a license for use in a commercial setting, please check Paragon Hard Disk Manager.
1. The Backup & Recovery Community Edition offers the following features:
- Automated backups [back up files or disks; get the necessary boot partitions]
- Adjustable backup scenarios [with custom backup parameters such as backup type, frequency/scheduling, retention, scenario-based backup jobs for “what” and “where” to backup]
- Disk space management [like automatic deletion of old backup images based on specific values]
- Version control [management of backups and easy recovery]
- Recovery within the WinPE environment
2. Paragon Open Cloud Backup (OCB) Platform is a set of tools for service providers to develop a flexible and holistic backup solution. There are two options for Cloud Backup offered by Paragon — first is to use the pre-developed solution or build your own on top of OCB. The basis of OCB is an SDK that contains the following components:
- Backup model framework
- Load forecasts reports
- Local agents bundle
- Cloud storage access
- Documents and instructions
The agents bundle includes the Backup Agent, Replication Agent, and Localworker, while the set of microservices consists of several services, including inventory, registry, storage, agent coordinator, jobs coordinator, and so forth. To check the full description of these services, see How PCB Platform works. By using OCB from Paragon, you’ll get the full documentation, including API and developer guides.
EaseUS ToDo Backup
Features that are offered with EaseUS ToDo Backup Home include:
- File backup (automated backup on your directories, files, where you can also compress file images to save space, encrypt files to protect privacy)
- Full system backup (where you can backup Windows with user settings, create a bootable backup, and easily restore the system)
- Backup disk/partition at a block-level
- Backup storage support to anywhere — HDD, external drive, tape, FTP, network, NAS, CD/DVD, cloud services like OneDrive, Google Drive, and Dropbox
- Smart backup option: a utility that makes backups easier than ever before. With Smart backup, you can schedule automatic backups, select files and folders you want to back up
- System cloning [duplicating your operating system to an HDD, SSD, USB, other storage media]
- Migrating OS to SSD/HDD or cloning HDD to an SDD without reinstalling Windows
Aomei Backupper
Aomei Backupper Standard is a free backup program for personal use, where you can:
- Create a system image to keep your Windows and applications safe
- Backup entire HDDs/SSDs or specific partitions
- Create image backup for files and folders & sync files from a source location to destination
- Create set-and-forget tasks with automatic backups or perform incremental or differential backups
- Clone a smaller HDD to a larger HDD for disk upgrade or HDD to SDD for performance
- Create a bootable rescue media
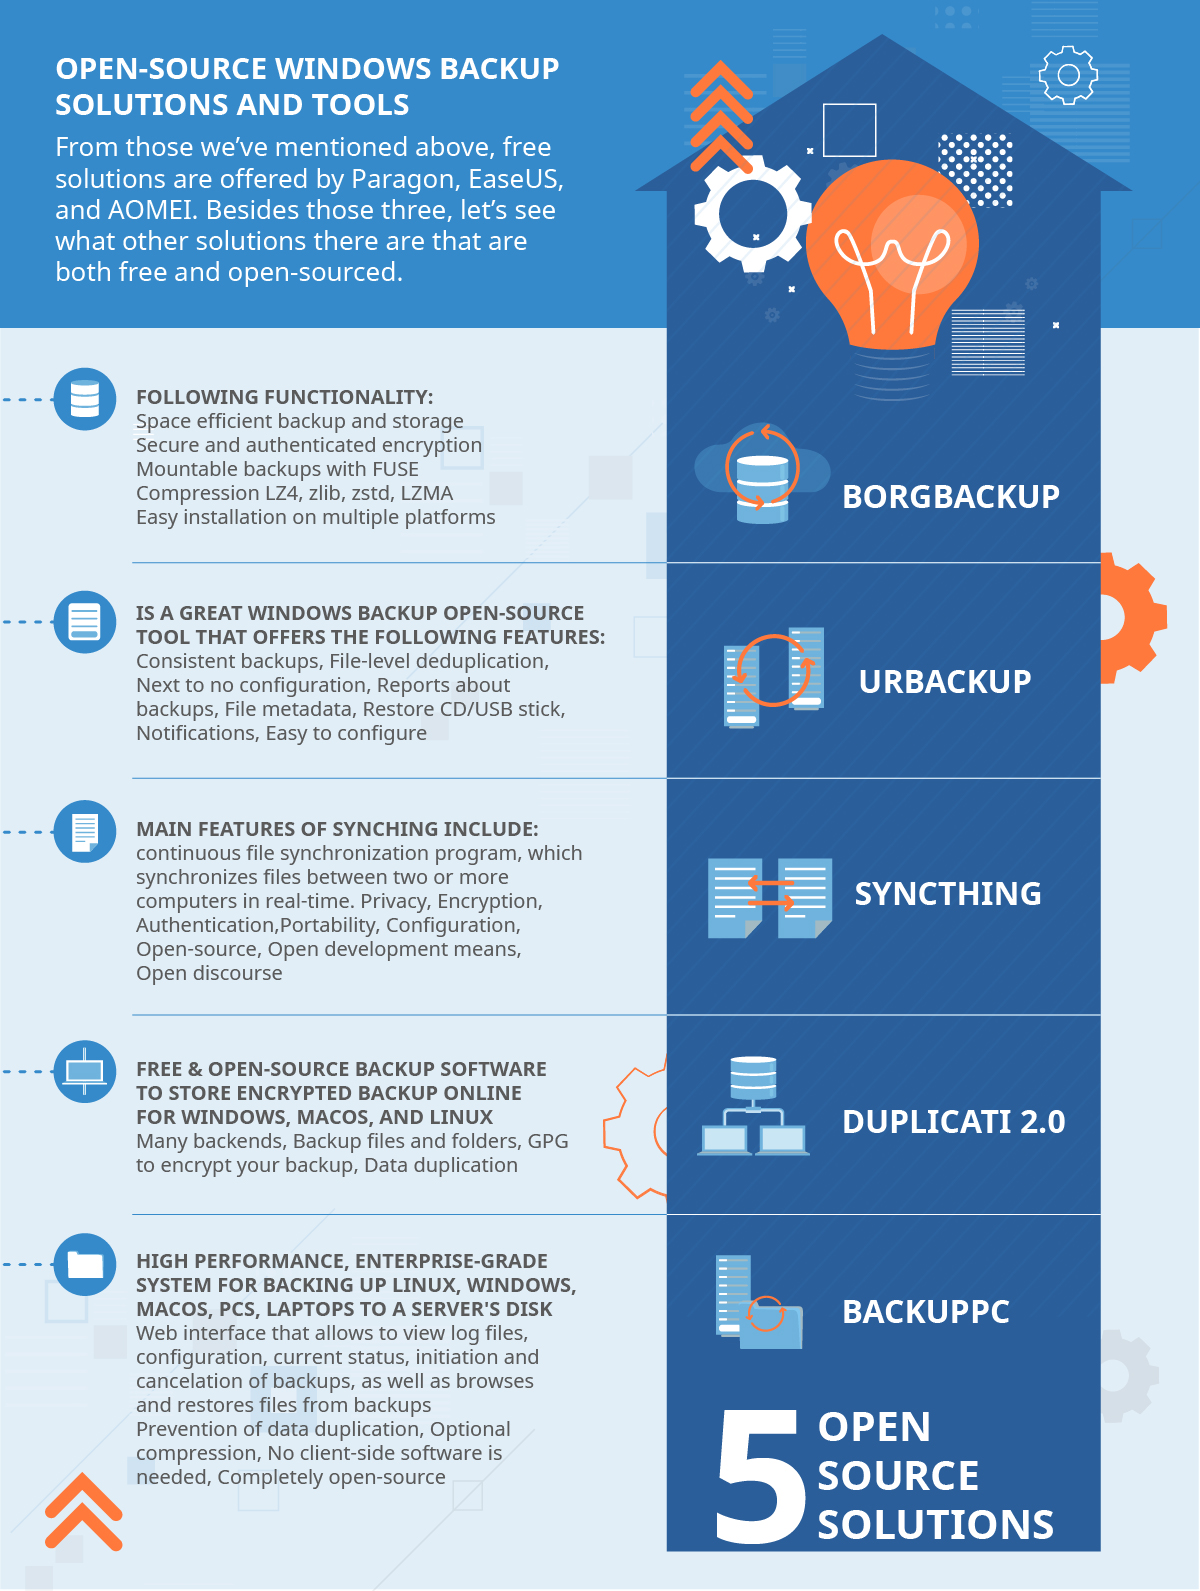
Open-source Windows backup solutions and tools
From those we’ve mentioned above, free solutions are offered by Paragon, EaseUS, and AOMEI. Besides those three, let’s see what other solutions there are that are both free and open-sourced.
BorgBackup
BorgBackup solution gives you the following functionality:
- Space efficient backup and storage
- Secure and authenticated encryption
- Mountable backups with FUSE
- Compression LZ4, zlib, zstd, LZMA
- Easy installation on multiple platforms
UrBackup
UrBackup is a great Windows backup open-source tool that offers the following features:
- Full and incremental system and file images [whole partitions as well as single directories]
- Consistent backups of used files on Windows and Linux
- File-level deduplication (same files on different computers are saved only once)
- Backup frequency and number of backups (can be easily changed)
- Next to no configuration
- Web interface that shows the status of the clients, current activities, and statistics.
- Reports about backups
- File metadata such as last modified time is backed up
- Easy to use file and image restore (via restore CD/USB stick)
- Notifications (such as email alerts)
- Easy to configure and use file backup access
Syncthing
Syncthing is a continuous file synchronization program, which synchronizes files between two or more computers in real-time.
Main features of Syncthing include:
- Privacy — your data is stored only on your computers (so there’s a central server that might be compromised)
- Encryption — all communication is secured using TLSm, and encryption includes perfect forward secrecy to prevent any eavesdropper from accessing your data
- Authentication — every node is identified by a strong cryptographic certificate
- Portability — configure and monitor Syncthing via a responsive interface that works on macOS, Windows, Linux, FreeBSD, Solaris, OpenBSD
- Configuration — syncing doesn’t need IP address or advanced configuration. It just works over LAN and over the Internet
- The open protocol contains a document specification
- Open-source — all source code is available on GitHub
- Open development means that any buys are visible to anyone
- Open discourse allows for a comprehensive dialog
Duplicati 2.0
Duplicati 2.0 is a free & open-source backup software to store encrypted backups online for Windows, macOS, and Linux. The source code is licensed under LGPL. Duplicati runs under Windows, Linux, macOS. It requires .NET 4.5 or Mono.
Features:
- Many backends: Duplicati works with standard protocols like FTP, SSH, WebDAV, and popular services like Tardigrade, Backblaze B2, Microsoft OneDrive, Amazon S3, Google Drive, box.com, Mega, hubiC, and others.
- Backup files and folders with strong AES-256 encryption. GPG to encrypt your backup
- Save space with incremental backups and data duplication
- Backups can be run on any machine through a web-based interface or via a command-line interface.
BackupPC
BackupPC is a high-performance, enterprise-grade system for backing up Linux, Windows, macOS, PCs, laptops to a server’s disk. The latest release was issued on February 17, 2020.
Features:
- Web interface that allows viewing log files, configuration, current status, initiation and cancelation of backups, as well as browses and restores files from backups
- Prevention of data duplication allows for storage of identical files only once to save disk space and disk I/O
- Optional compression allows for a modest impact on CPU time
- No client-side software is needed
- Completely open-source, BackupPC is hosted on GitHub and distributed under a GPL license.
If you have found a spelling error, please, notify us by selecting that text and pressing Ctrl+Enter.

Leave a Comment