Data migration is a critical, strategic process that should never be taken lightly. As such, it’s imperative to learn and prepare accordingly.
If you’re currently learning about data migration and preparing to replace or upgrade servers, optimize business processes, switch platforms, or relocate to a data center, then you should find helpful answers to your questions in this article.
By the end of this article, you’ll learn the following:
- What data migration is and why it’s important
- The main phases of the data migration process
- Data migration categories and strategies
- Steps involved in the data migration process
- Data migration templates for AWS, Azure, SAP, Salesforce, etc. and
- TOP 3 tools that will help you seamlessly migrate data.
What is data migration and why is it important?
According to Wikipedia, data migration is defined as “the process of selecting, preparing, extracting, and transforming data and permanently transferring it from one computer storage system to another.” In other words, data migration is the process of transferring data from a source system to a target system.
In addition to the data transfer process itself, the validation of migrated data for completeness, as well as the decommissioning of legacy data storage, are also considered part of the data migration process.
While data migration is an important process, it’s also rather laborious. Due to this, data migration is typically automated in order to free employees from otherwise needing to perform arduous tasks. Automating the process also reduces the chances of human error.
There are many reasons for migrating data, such as
- Server or storage equipment replacements
- Maintenance or upgrades
- Application migration
- Disaster recovery
- Website consolidation
- Datacenter relocation
Data migration is extremely beneficial and can have a positive effect on your business. The following are potential benefits of data migration:
- Minimizes unnecessary interruption activities
- Maintains data integrity
- Decreases the cost of media and storage
- Minimizes daily manual effort
- Boosts performance, productivity, and competitiveness
- Maintains the growth of the business
On the other hand, some migrations are less successful and can result in data inaccuracies and redundancies. Therefore, it’s imperative to thoroughly plan the data migration process. Careful planning ensures maximum benefits and minimal downtime.
The main phases of data migration
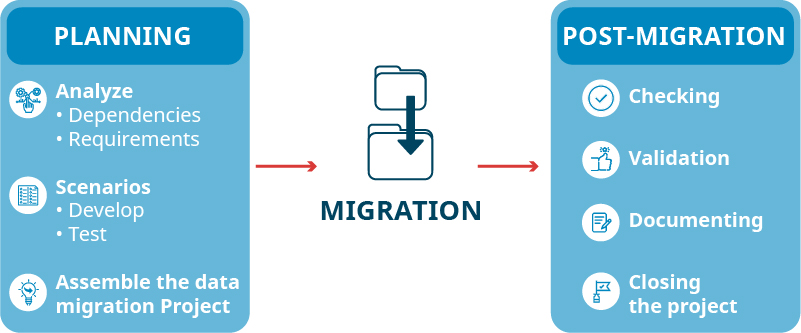
There are three main phases for any data migration project: planning, migration, and post-migration. Each of these phases can be repeated several times if the project is of moderate or high complexity.
Let’s go over these phases and outline the major steps involved in each:
Planning
Planning is the stage in which dependencies and requirements are analyzed, migration scenarios are developed and tested, and a project data migration plan is created.
Planning typically involves the following stages:
- Choosing the data, applications, etc. to migrate based on the project, technical requirements, and dependencies
- Analyzing hardware and bandwidth requirements
- Developing migration and fallback scenarios
- Refining associated tests, automation scripts, mapping, and procedures
- Gauging data cleansing and transfer requirements for data formats. This ensures maximum quality and reduces redundant or obsolete information.
- Determining and establishing migration architecture
- Obtaining the necessary software licenses
- Implementing changes to the management processes
Migration
Migration is when the project plan is initiated.
Migration consists of the following stages:
- Validating hardware and software requirements
- Customizing the migration procedures
- Prevalidation testing
- The migration process itself, including data extraction (from the old system) and data loading (to the new system)
- Verifying that the migration process was completed successfully
Post-migration
During the post-migration stage, the migration is checked for completeness. After this, it gets validated, documented, and closed.
The steps which comprise the post-migration stage include
- Determining whether data was accurately translated
- Running both systems in order to identify any discrepancies or data loss
- Documenting and reporting of the migration project
- Validating the migration process and ensuring it completed successfully
- Decommissioning legacy systems
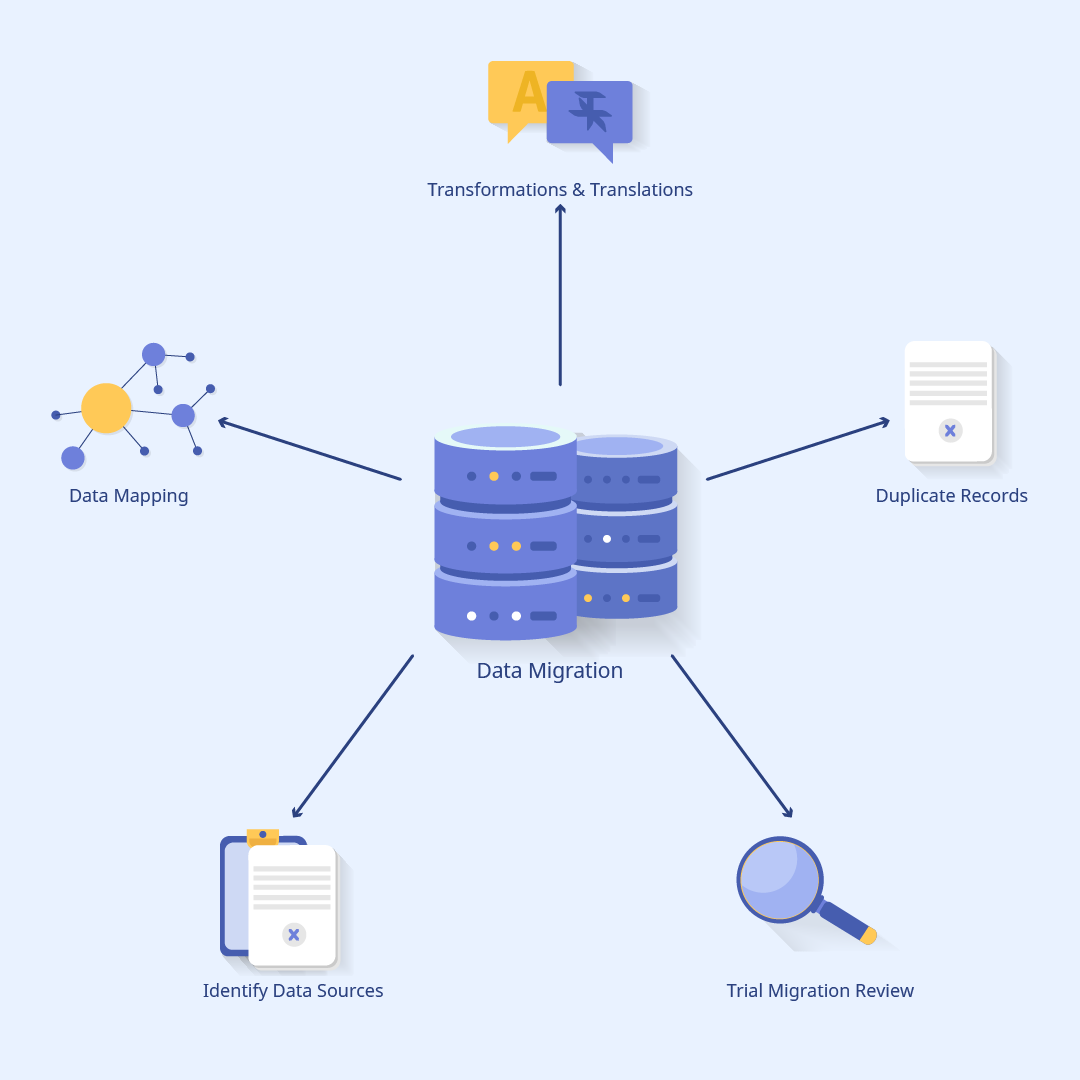
Data migration categories
There are four distinct categories within the data migration process. They are as follows:
Storage migration
Storage migration is moving blocks of storage and files from one storage system to another, whether the data resides on a disk, tape, or in the cloud. The goal of such a migration is faster performance, dynamic scaling, and improved data management.
Storage migration is justified and employed when there’s a need for:
- Technology refreshes (i.e. new server hardware)
- Data validation and reduction by identifying obsolete or corrupt data
- Remediation of any orphaned storage or inefficiencies
Database migration
Database migration occurs when there’s a need to change database vendors, upgrade the database software, or move the database to the cloud. This is the migration category in which data is modified, but the schema is not changed.
Important things to consider while migrating databases include:
- Assessing database size and determining storage requirements
- Testing apps
- Ensuring data confidentiality
- Checking for compatibility issues
Application migration
Application migration is the process of moving data within an application or switching to another app vendor or platform. In order to perform this successfully, it may require the involvement of middleware products to bridge inherent gaps in technology. This is due to the complexity of the processes involved and differences in the app environments and data models.
Cloud migration
Cloud migration is the process of moving an application, data, or other business elements from an on-premise location to a cloud (or between clouds).
Business process migration
Business process migration is moving data from one storage, database, or app to another. The purpose of this is to adjust or adhere to organizational changes, and to provide accurate information regarding operations, products, and customers.
Business optimization, mergers, acquisitions, reorganization to enter new markets, and responding to competitive threats are scenarios in which you may want to consider business process migration.
Data migration vs data integration vs data conversion
Data migration differs from other processes such as conversion and integration. Let’s define each of these below:
As previously mentioned, data migration is the process of moving data between locations, systems, or formats.
In a typical data migration scenario, data conversion is the first step and involves transforming data from one format to another. The conversion process includes the extraction, alteration, and loading of data onto a new target system. Data conversion might be necessary when moving data from a legacy app to an updated version or a different app.
Data integration refers to the process of combining data that resides within different sources and providing users with a unified view of all the data. For example, data analytics depend on data integration to combine all the data from various sources. Without data integration, data analytics wouldn’t be able to create easily legible, informative, “single pane of glass” dashboards.
Types of data migration strategies
While there are many ways to implement the migration process, most of the strategies fall into two categories:
Big Bang migration
As the name suggests, while utilizing this approach, the migration happens in a one-shot event.
During Big Bang, live systems experience downtime while data goes through extract/transform/load (ETL) processing and transitions to a new database.
Due to the immense pressure on business operations associated with this approach, the risks of failure are greater, as are the risks of the implementation becoming compromised.
Trickle migration
During trickle migration, the migration process happens in phases, with the old and new systems running concurrently. This eliminates downtime or operational interruptions.
On the downside, this approach usually turns out to be rather complex and is more time-consuming. Thus, if considering this approach, careful planning and caution are required.
Key steps to the top-notch data migration process
Each data migration process will vary across businesses and depends largely on organizational needs, but every migration plan typically follows a similar pattern.
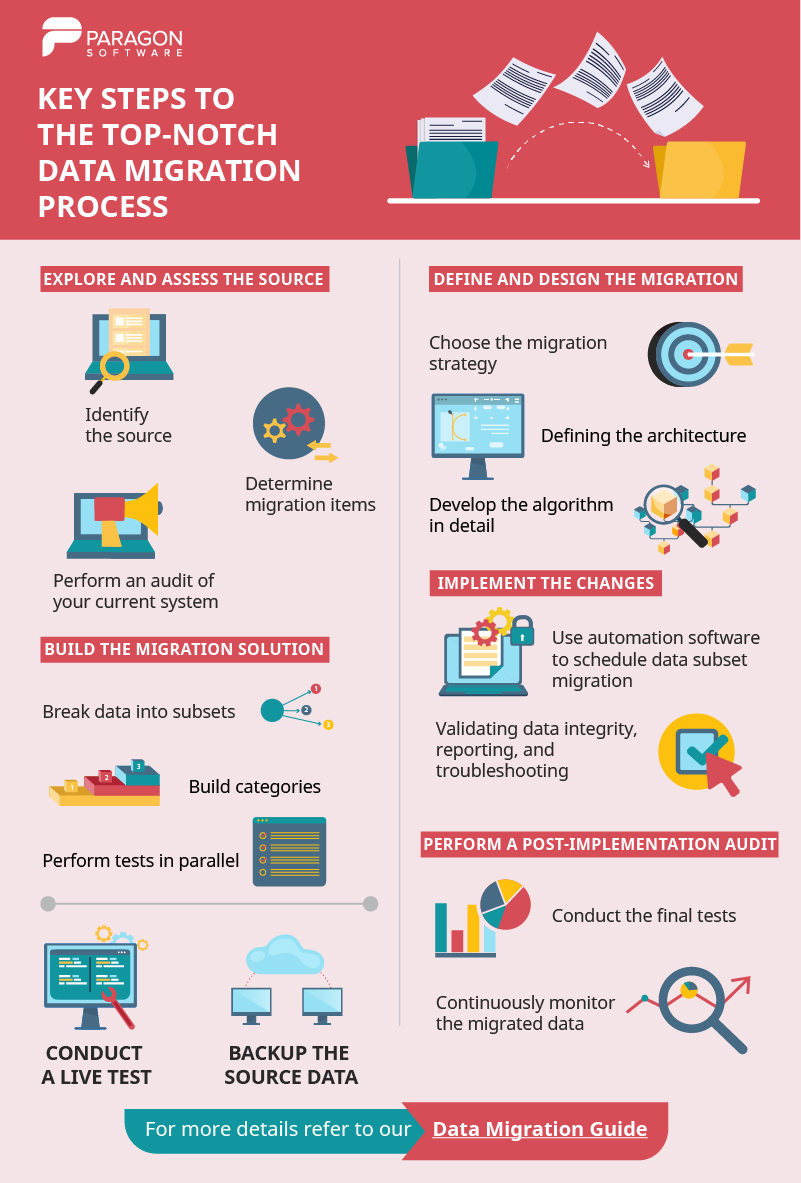
You can download and use this infographic (just by clicking on it). Also, let’s dive a little bit deeper into the subject.
Explore and assess the source
First, you need to identify the source and target systems, as well as the data that’s planned for migration.
Determine what should be migrated, what can be left behind, and what might be missing.
You might need to perform an audit of your current system. During the audit, you may encounter poorly populated data fields, inaccuracies, incomplete data pieces, and other inconsistencies. The results from the audit might deter you from migrating your data or cause you to question the viability of the process.
Failure to perform an audit may result in critical flaws, which can halt the migration process.
Define and design the migration
The design stage involves choosing the migration strategy (big bang or trickle), defining the technical architecture, and detailing the process.
Other concerns that should be addressed include any source and target system specifications, security plans, timelines, etc.
It’s also important to work with your end-users to figure out what they expect from the migration process, such as: better performance, analytics, optimization of business processes, etc.
Build the migration solution
A common technique is breaking data into subsets and building categories one at a time, usually building and testing in parallel.
Conduct a live test
The testing process is not over after the build phase and it’s imperative to continue testing on real data. This ensures the implementation is accurate.
Back up the source data before you move it
It’s essential to ensure your data is backed up prior to moving it. The best practice is to create backups of system images. This way, in the event of unexpected data loss, restores can be performed quickly.
You can read our Ultimate Guide for Backup Data for more information.
Implement the changes
If possible, it’s best to automate the data migration process.
For best results, select software which allows for scheduling data subset migration, validating data integrity on the target system, reporting, and troubleshooting.
Active migrations should be protected with a tool that syncs the source and target databases in real-time.
Perform a post-implementation audit
Conduct the final tests and carefully resume production.
Be sure to perform a post-implementation audit, and if everything runs smoothly and checks out, shut down the legacy system.
It’s important to note that post-implementation auditing does not end once the legacy system is retired. It is necessary to continue monitoring the migrated data for unusual access patterns, security issues, orphaned work sets, and any anomalies which could disrupt business operations.
Data migration to cloud
Cloud migration is moving data, apps, or other business elements to a cloud computing environment.
There are different scenarios in which data is transferred to the cloud, such as: from an on-premises datacenter to a public cloud, or from one cloud platform or provider to another.
The process of moving data off the cloud is called a reverse cloud migration, cloud repatriation, or cloud exit.
In order to aid cloud migration and accelerate migration projects, it’s best to use highly scalable cloud integration tools and secure cloud integration platform-as-a-service (iPaaS).
Four main types of cloud migration exist: migrating to a public or private cloud, utilizing both types of clouds (hybrid cloud), and using IaaS.
A public cloud grants users access to compute resources through the internet or via dedicated connection.
A private cloud keeps data within the data center and has a proprietary architecture.
The hybrid cloud model combines both private and public clouds and transfers data between the two.
A multi-cloud scenario is utilizing IaaS options from more than one public cloud provider.
Current mainstream hybrid and multi-cloud solutions include:
- Microsoft Azure Stack
- AWS Outposts
- VMware Cloud on AWS
- Google Cloud Anthos
- Cloud Foundry
- Red Hat OpenShift
Different data migration templates
Salesforce
‘Data migration in Salesforce’ template typically involves the following stages: preparation, data selection, data mapping, the migration itself, and quality assurance.
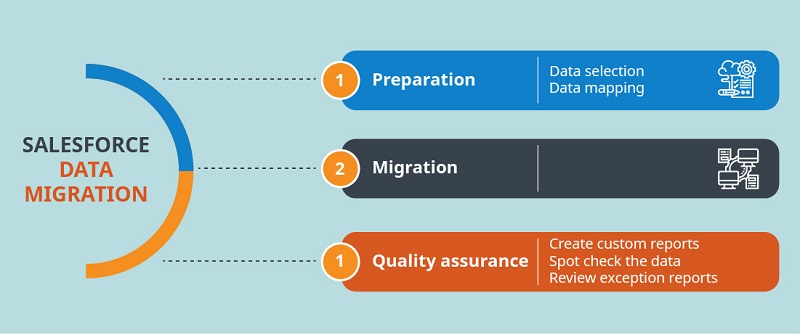
Preparation
Preparation is the most critical part of Salesforce data migration. Failing to adequately prepare can lead to catastrophic results.
Data selection
Data selection is identifying the data (objects) to migrate and the data source of truth, which is typically a backend and CRM in a business. It may be necessary to build additional objects and processes when analyzing the data that needs to be migrated.
For example, you might need to migrate only account information from a division or contact information from each account.
Data mapping
Data mapping is ensuring all records of each source system have a unique identifier. Moreover, if a data category in a source system corresponds or is related to a category in a target system, a unique identifier is required in each related record.
Data cleansing will be needed if identifiers (IDs) are not in place. It’s also important to get rid of duplicated and outdated accounts. Work with users to identify what should be discarded and what should be kept.
Acquire a sample of metadata from the source system to get a better idea of how the data is structured in every source system. Be sure to include every field and table in the sample.
Map admin tables, fields, and values in your source system using different salesforce objects, fields, and values in your new salesforce system. The more differences between the systems and the more sources to extract data from, the more complex the mapping.
Create an excel template for each object using a data export from the Salesforce data loader. Identify the required fields for each object. For example, for best results you may wish to always migrate users first, then accounts, and then opportunities. Review your data and then populate your templates. Load one record, check the result, then load another record, and repeat the process. Custom fields can be created to store any legacy ID information.
Migration
Migration is the actual process of transferring data from the source system to your new salesforce system. The method you choose will largely depend on the following:
- Types of resources available
- The volume of records
- The complexity of the source data
- The complexity of data transformation
- Differences between the source and target models
Quality assurance
During QA, it’s important to ensure that all data has been transferred correctly. For instance, checking to make sure the format and relationships between different data tables are correct. If QA fails to produce favorable results, retrace and identify the phases in which errors occurred, then execute the process accordingly.
The following techniques can be used to validate your migration:
- Create custom reports to validate record counts and provide a snapshot of the migration
- Spot check the data
- Review exception reports
Mac
Thanks to Mac Migration Assistant, data migration has never been easier. Below you’ll find the basic template for Mac data migration:
Preparation
1. Update your OS X to the latest version
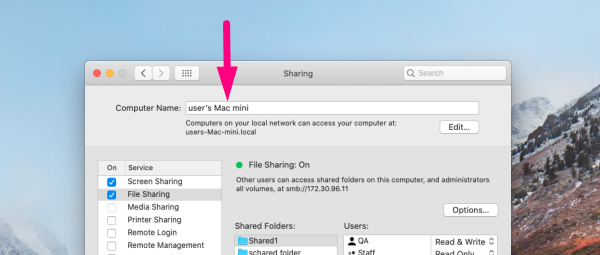
2. Name your old Mac:
2.1 Choose System Preferences →
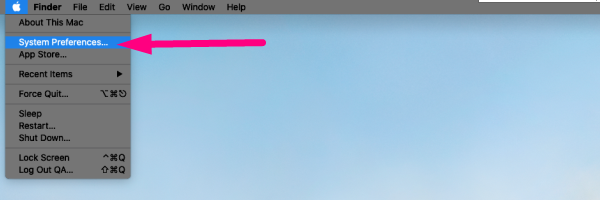
2.2 Find and select Sharing folder →
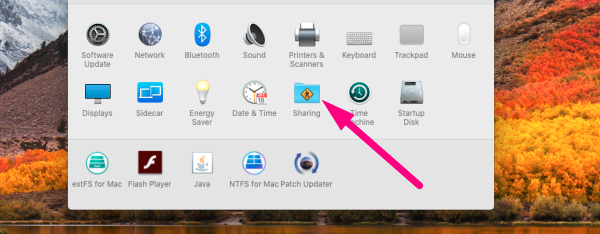
2.3. Type the name in the Computer Name field
3. Connect both Macs to a power source
4. Now you can use Wi-Fi to migrate your data (make sure both Macs are connected to the same Wi-Fi network), but the process can be quite slow, and therefore, we recommend using Thunderbolt, FireWire, or Ethernet cables (henceforth will be referred to just as “the cable”).
Migration
1. Connect both Macs with the cable (or just connect to Wi-Fi)
2. On your new Mac → click on the Finder icon in your Dock to launch a Finder Window →

2. 1 Click on Applications in the sidebar →
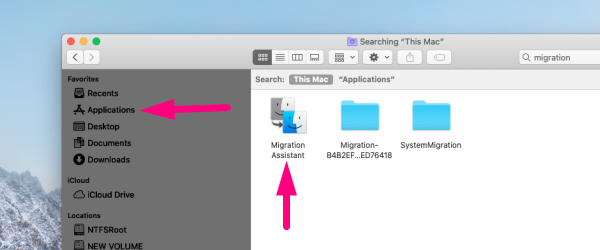
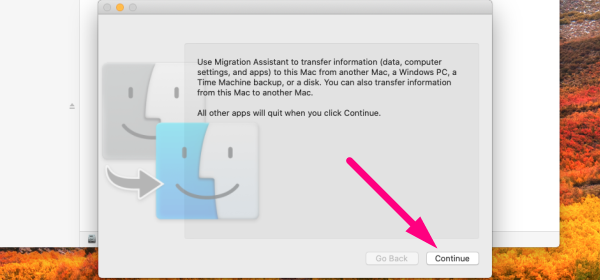
2.2 Double-click on the Utilities folder → double-click on Migration Assistant → click Continue →
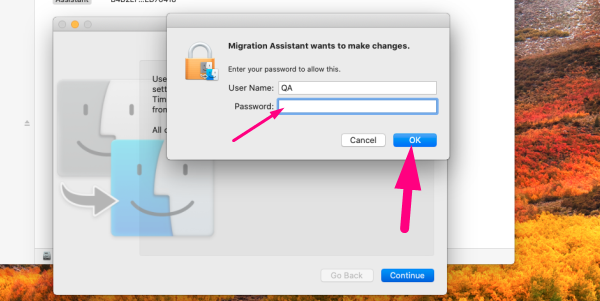
2.4 Enter your admin password (if prompted) and click Ok →
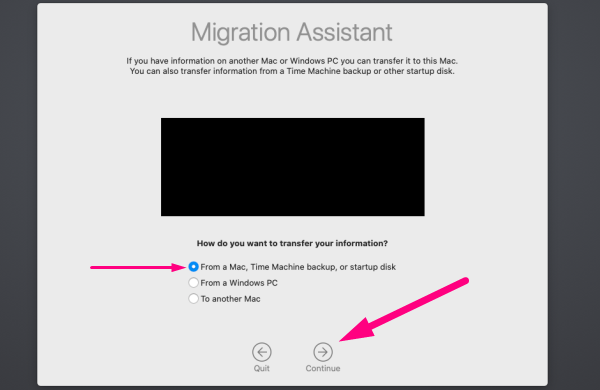
2.5 Click From a Mac → click Continue
3. Now repeat the same steps on your old Mac except choose To a new Mac [instead of From a Mac]
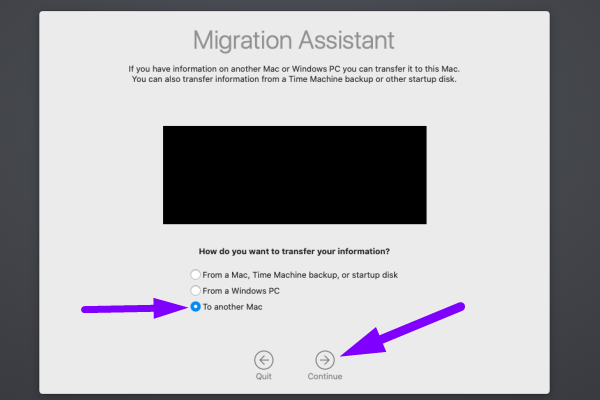
4. Go back to your new Mac →
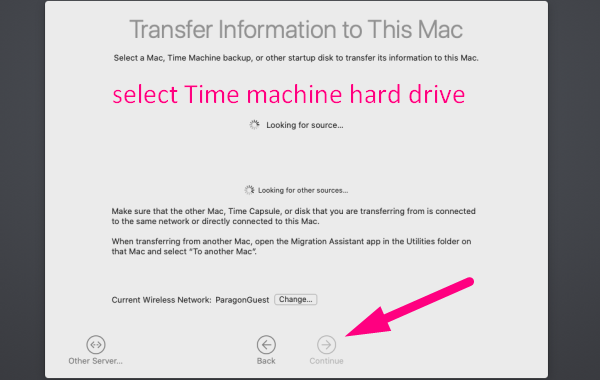
5. Migration assistant will be looking for a source → select your old Mac [if you’re using Time Machine backup, select Time Machine hard drive] → click Continue [a security code will appear on screen]
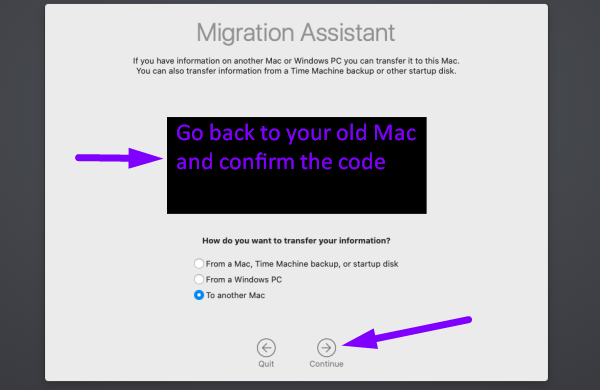
6. Go back to your old Mac → confirm the code → click Continue
7. On your new Mac → select information to transfer → click Continue
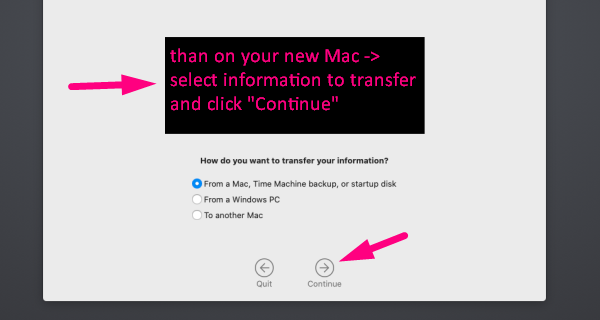
8. Now watch the data being migrated, which might take a while.
Azure
The simplified Azure database migration process involves the following steps:
Pre-migration
- Discover: inventory database assets and app stack discovery
- Assess: assess workloads and recommend necessary fixes
- Convert: convert the source schema to work in the target environment (for heterogeneous migrations)
Migration
- Migrate: migrate the source schema, source data, and objects to the target
- Sync data: sync your target schema and data with the source (for minimal-downtime migrations)
- Cut over: cut over from the source to the target environment (for minimal-downtime migrations)
Post-migration
- Remediate apps: continue to make any necessary changes to your apps
- Perform tests: run many functional and performance tests
- Optimize: address performance issues and then retest to confirm the performance improvements.

Customized migration schemes are also available. In order to receive them, navigate to the official website for Azure Database Migration. Once there, simply select the source and target systems.
Additionally, there’s also a portal known as Azure Migrate. This is a central hub for discovery, assessment, and migration of on-premises workloads to Azure. Another useful tool is Azure Database Migration Service, which helps simplify, guide, and automate database migration to Azure.
AWS
Migrating databases to AWS can be executed quickly and seamlessly using the AWS Database Migration Service. During the migration process, the source database remains fully operational. This minimizes the downtime of apps which rely on that database. The AWS DM Service (henceforth referred to as AWS DMS) portal describes two schemas for different migration types. These migration types include heterogeneous (e.g. Oracle to Amazon Aurora) and homogenous (e.g. Oracle to Oracle). Herein, you can learn more about the supported source and target databases.
Let’s walk through one of the AWS database migration examples: migrating from an on-premise Oracle database to Amazon Aurora MySQL.
AWS DMS migrates the data from the Oracle source to the Aurora MySQL target. AWS DMS captures data manipulation language (DML) and data definition language (DDL) changes in the source database. It then applies them to the target database (which keeps both databases in sync). While AWS DMS can migrate primary key indexes and tables, it doesn’t migrate your secondary indexes, sequences, stored procedures, triggers, synonyms, default values, views, and other schema objects. To migrate these objects, it’s necessary to use the AWS Schema Conversion Tool.
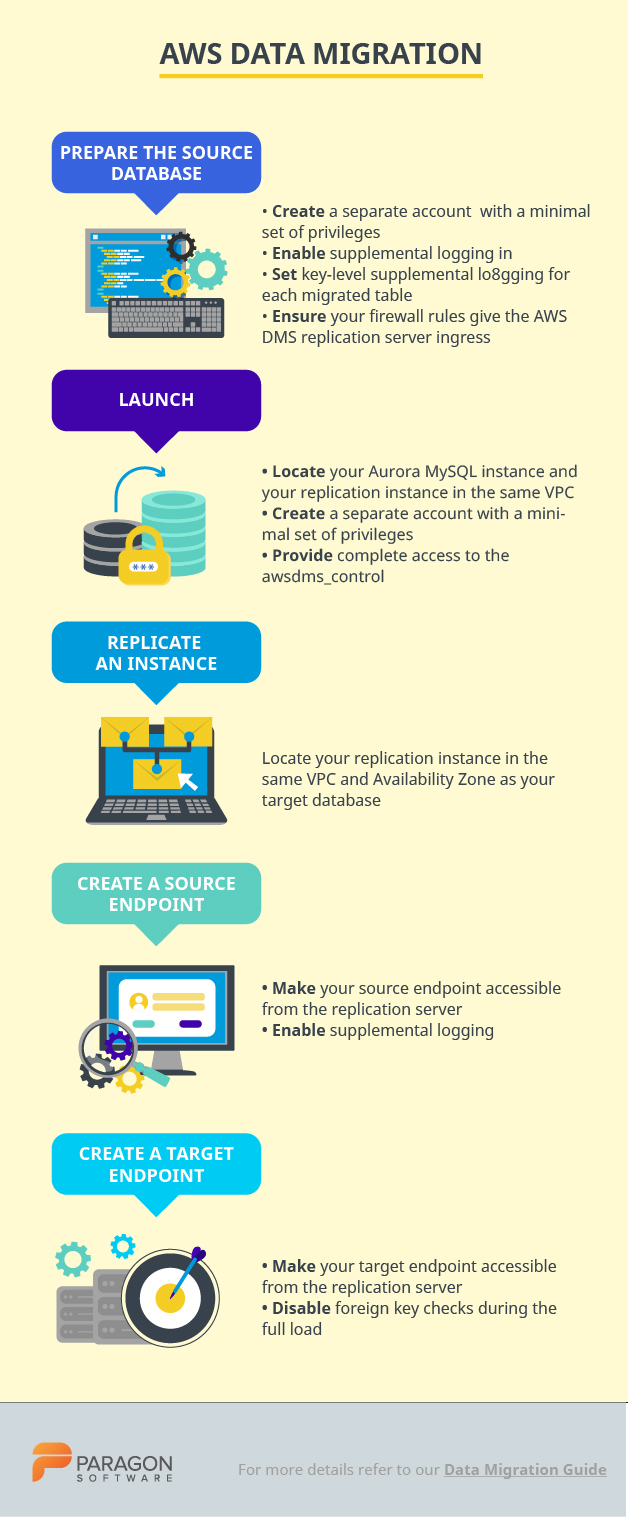
Preparation of source database:
- Create a separate account with minimal privileges for the purpose of migrating your data
- Enable supplemental logging in order to use DMS (ALTER DATABASE ADD SUPPLEMENTAL LOG DATA)
- Set at least key-level supplemental logging for each migrated table (addSupplementalLogging=Y)
- Ensure your firewall rules grant access to the AWS DMS replication server
Launching and preparation of target database:
- Locate your Aurora MySQL instance and your replication instance in the same VPC [and if possible, the same Availability Zone]
- Create a separate account with a minimal set of privileges for the purpose of migrating your data. For instance, set the following privileges: ALTER, CREATE, DROP, INDEX, INSERT, UPDATE, DELETE, SELECT.
- Provide complete access to the awsdms_control database (ALL PRIVILEGES ON awsdms_control.* TO ‘dms_user’)
Launching a replication instance:
- Locate your replication instance in the same VPC and Availability Zone as your target database. If either your source or target database is outside VPC, then the replication server must be publicly accessible.
Creating a source endpoint:
- Make your source endpoint accessible from the replication server. Most likely, you’ll need to modify your firewall rules to whitelist the replication server.
- Enable supplemental logging: add “addSupplementalLogging=Y” to the extra connection attributes for your Oracle source endpoint
Creating a target endpoint:
- Ensure your target endpoint is accessible from the replication server. Modification of security groups might be necessary.
- Disable foreign key checks during the full load: add “initstmt=SET FOREIGN_KEY_CHECKS=0” to your extra connection attributes
Creating and running a migration task:
Set migration parameters by following these steps:
- Choose the endpoints and replication server
- Choose to migrate existing data and replicate ongoing changes
- Choose drop tables on target (if AWS DMS creates your tables, but for all other methods, choose truncate)
- Enable logging
- Convert your schema, table, and column names to lowercase. In order to do this, you’ll need to create a custom table mapping.
SAP
SAP enables data migration to SAP S/4HANA from any legacy system. To aid the migration process, there’s the SAP S/4HANA Migration Cockpit and a set of predefined data migration objects.
These are the different options for on-premises data migration in SAP S/4HANA:
- S/4HANA Migration Cockpit with Migration object modeler (an automated migration tool provided with preconfigured content and mapping for each migration object)
- SAP Data Services (SAP DS)
- SAP Rapid Data Migration
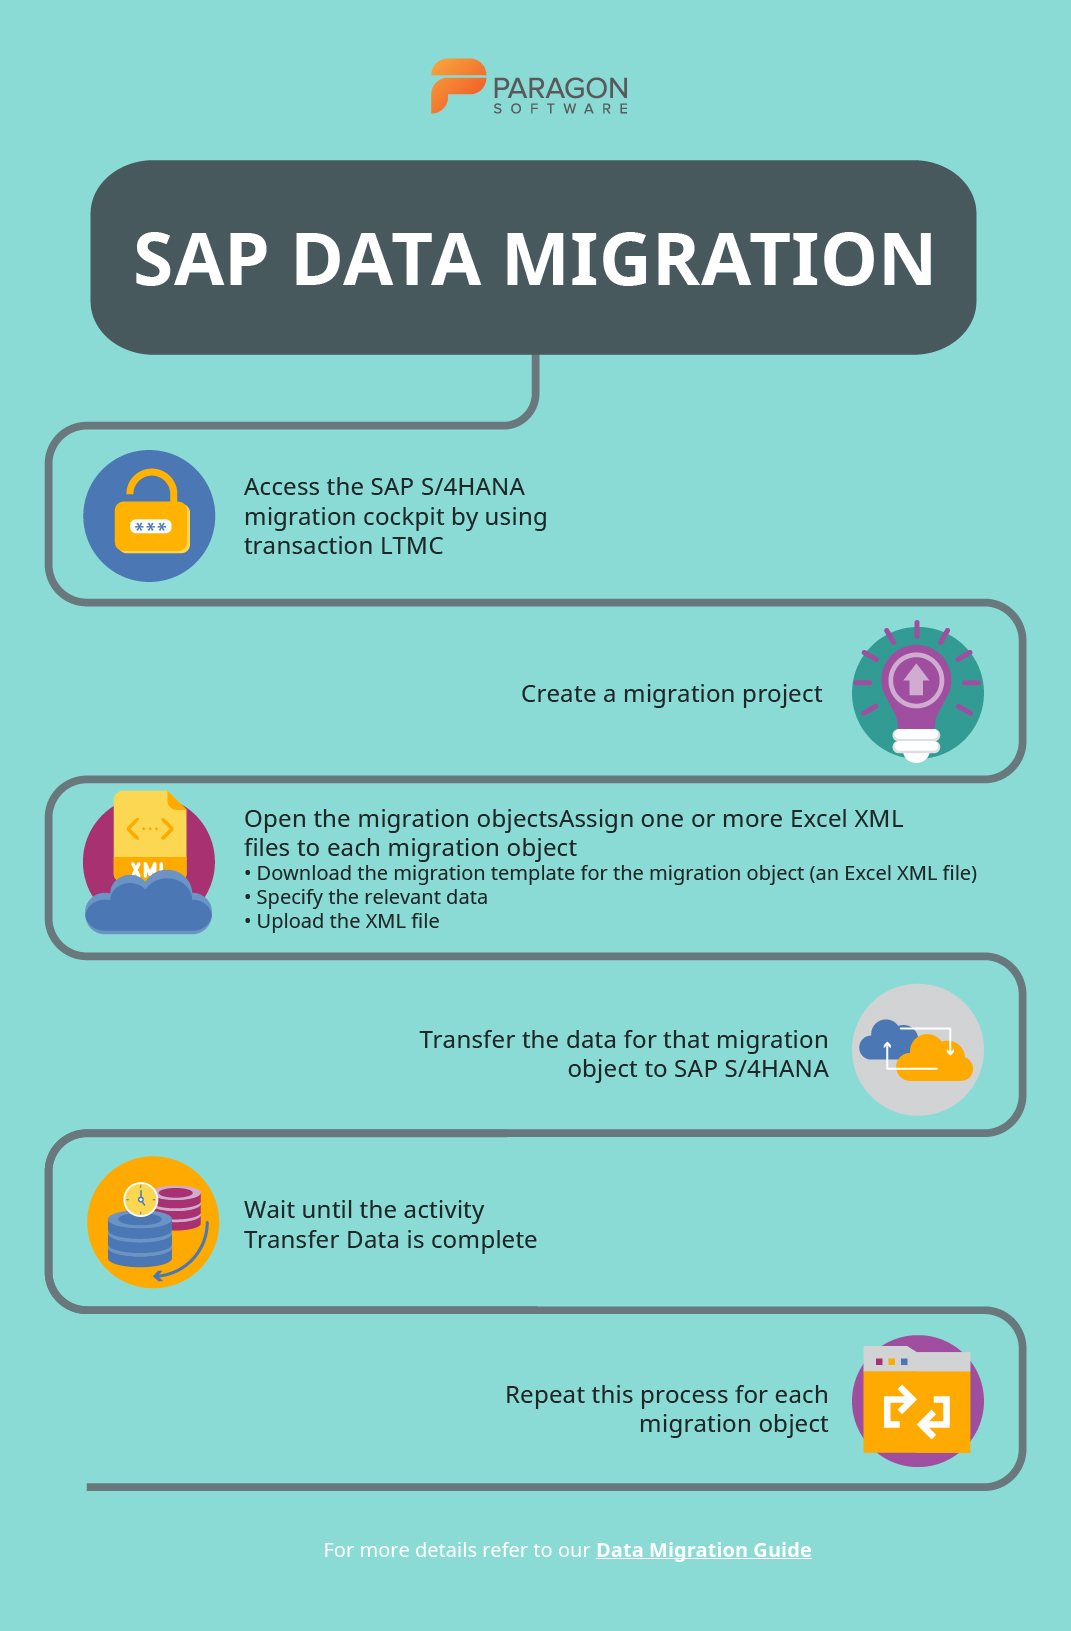
Below is an overview of the data migration process using SAP Migration Cockpit:
- Access the SAP S/4HANA migration cockpit by using transaction LTMC
- Create a migration project (or open an existing one)
- Open the migration objects that are relevant to your project
- Assign one or more relevant Excel XML files to each migration object. Download the migration template for the migration object (an Excel XML file), specify the relevant data, and upload the file.
- Transfer the data for that migration object to SAP S/4HANA
- When the activity Transfer Data is complete, the data will be migrated to SAP S/4HANA
- Repeat this process for each migration object that is relevant to your project
More information on SAP is available here.
G Suite
Google G Suite provides some native tools for migration:
- Data Migration Service – available for G Suite Enterprise, Business, Basic, and Education accounts. Used to transfer data directly from the administration console
- Google Takeout – free and can be used for all native Google Apps
- G Suit Sync for Microsoft Outlook (GSSMO) – not exactly a migration tool, but a convenient sync tool that can be used for synchronizing G Suite and Office ecosystems
The process of migrating data with Data Migration Service is described below:
1. Check where you can migrate from. Things you can migrate:
- Contacts
- Calendar events
- Calendar resources
2. Set up your new G suite domain:
- Add users to your G suite domain
- Turn on the target Google service for users
- Make sure your users have a license
3. Set up your TLS certificate.
4. Prepare your legacy environment by setting it up correctly. Depending on your legacy system, the process will differ.
5. Migrate data. You can migrate emails, contacts, or calendars in a single session, but you cannot migrate two or more of these concurrently. Thus, they must be migrated separately.
Top 3 tools for data migration
Paragon Drive Copy Professional
Paragon Drive Copy professional is available as part of another solution known as Hard Disk Manager (HDM for home, for business). Using Drive Copy, you can create backups, manage partitions, clone, and migrate data. There is a wide range of copy operations you can perform. These include: copying a hard disk in its entirety or copying individual partitions, migrating a Windows OS from HDD to SSD, excluding data you don’t wish to migrate. User-friendly wizards to back up and restore data are included as well.
Prices for home use: $79.95.
Prices for business: from $99 (as a one-time payment) to $899 (subscription-based)
Other solutions from Paragon that can serve the same purpose:
Technically, data migration can be accomplished using the backup-and-restore functionality of PBR, while the cloud migration can be achieved using PCB. There’s also the migration of virtual environments, which can additionally serve as redundant backups. The most sensible approach to migrating virtual environments is to use Virtual to Virtual (V2V) technology, which Paragon has implemented in HDM. Another option is to build an app using Paragon’s sources and then perform the data migration using any of the above approaches. This can be accomplished using the PCB SDK.
Acronis True Image
Acronis True Image is a software suite with extensive functionality. The features range from backing up files and folders to securing backups using enterprise-grade AES-256 encryption. When it comes to data migration, there’s a tool Active Disk Cloning. This tool migrates the OS, files, applications, settings, and etc. from the source to the target system.
Price: from $49.99 to $99.99 per year.
Zinstall
If you’re moving to a new PC, wish to upgrade Windows without losing data, capture backups to an external HDD, or migrate a Windows server to new hardware (OS or cloud), then Zinstall can help you accomplish these tasks. Different Zinstall solutions exist for different purposes. For example, you can purchase Migration Kit Pro for more complex migrations. Alternatively, Zinstall WinServ can be used to migrate data from one Windows Server to another. Both of these solutions are available separately.
Price for Migration Kit Pro: $169
If you have found a spelling error, please, notify us by selecting that text and pressing Ctrl+Enter.
Leave a Comment